AAR – Vehicle Close Quarters Battle Instructor with William Petty


Class: Vehicle Close Quarters Battle (VCQB) Instructor
Instructor: William Petty
Location: 88 Tactical Lodge Tekamah, Nebraska
March 29th to April 1st, 2016
*Most of the photos are from Mellor Photography and were provided to students for personal use*
Disclaimer: First off, to ensure everything is on the up and up, I received a compensated slot to attend this class. Second, I paid out of pocket for my airfare, rental car and ammunition to attend.
What is VCQB? It is the name of the curriculum that has stuck. It is close quarter’s engagements around vehicles – hence Vehicle Close Quarters Battle. Generally the term CQB has been applied to fighting inside a house, but Petty had to come up with a name and this is what he came up with. The program is specifically focused on Law Enforcement use. That said, if your life takes you around vehicles, you could apply some of the lessons learned.
Due to weather affecting my cross-country travel, I missed out on the morning and first half of the afternoon on training day one. As such I was unable to learn much about Petty’s BIO other than what he has posted on the 88 Tactical Website. He did state that he is currently a part time officer with a agency in Texas.
“Senior Instructor William Petty began his Law Enforcement career in 2003 in Albuquerque, NM. While there he served as a Firearms Instructor, an Emergency Response Team member, and was also a member of the department’s shooting team. In 2011, Petty relocated to Abu Dhabi, United Arab Emirates where he worked as a Counter Terrorism Instructor with the Critical National Infrastructure Authority.
Petty is currently assigned to patrol and serves as his department’s Range Master and primary Instructor. He is a Texas Tactical Police Officer’s Association Instructor and adjunct for several Regional Police Academies. As the National Director of Law Enforcement Training for 88 Tactical, William plays a key role in developing our cutting edge LE/MIL curriculum, and teaching it around the world.”
Petty helped catch me up after class on training day one to what has been covered already. To start with a quick overview of the 4 basic shooting positions that are common for use around vehicles. Those are; Standing, Squatting, Kneeling and Urban/Roll over prone. Various shooting drills to ensure student familiarity with those were run. Next a demo of Vehicle Ballistics. What Petty is teaching is counter common thought. Due to the public backgrounds of some of those combat veterans who disagree, I was curious of the in class presentation of Petty’s statements. I had previously suspected there was some context given for the presentation that would affect some of the statements. When Petty specifies a point on a car as cover, its within the context of a close range LE focused engagement such as found on a traffic stop or when ambushed in your patrol vehicle. You use the limited cover factor of the vehicle until able to get to something better, if it exists. I missed the first half of this demo, but I got to see the effects as well as impromptu do some of the same things later in the week.
What is cover? Cover is something that will stop the incoming round – whatever that is – from penetrating and hitting the target. All cover degrades over time – more hits, quicker it degrades. Rifle rated body armor for example is only good for a few hits before it quits working. Cover and Concealment as defined in Army Field manual 21-75 “Combat Skills of the Solider:”
- COVER-Cover gives protection from bullets, fragments of exploding rounds, flame, nuclear effects, and biological and chemical agents.
- CONCEALMENT-Concealment is anything that hides you from enemy observation. Concealment does not protect you from enemy fire
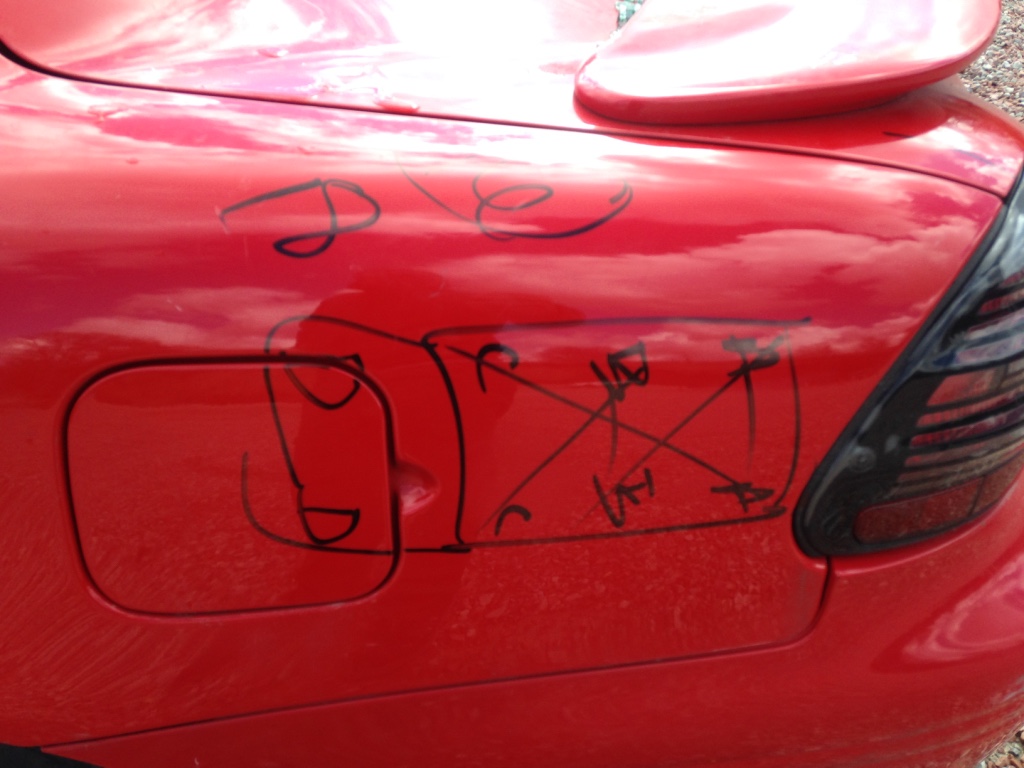
Using vehicles as cover: The long-standing rule on vehicles was that the engine block and wheel wells were the only thing that would stop bullets. I personally have never had the opportunity to shoot vehicles and see first hand what would or would not stop bullets. Petty teaches that there are 16 to 18 points of cover on a vehicle, but that is not where he stops. Vehicles are designed to have hard points on them that keep the occupants safe in the event of an accident. Each year, safety regulations drive manufacturers to make the vehicle safer with stronger materials and frame.
What are the 16/18 points? Starting at the front of the car, you are counting the engine block, each pillar that supports the roof (3 or 4), wheel well – tire, posts on the rear corners of the frame and then the opposite side of the car. Will these somewhat narrow points on a vehicle stop everything, every time? Nope. Are they something when there isn’t anything else? Yes. As such, you want to “stack” as many of them in between you and the threat. Some cover, beats no cover. Are you going to be sitting there for 15 minutes? Hopefully not, this is for a quick close quarters engagement where running away from your vehicle would cause you to be hit.
Overhead view of the pillars and some of the 16/18 points of cover:
Real World Example: The North Hollywood Shootout is a example many of us are familiar with. Patrol Officers and Detectives were shot and pinned down unable to move from behind the cover and concealment their cars offered. If a spot on the car will stop bullets better than others, why not use it to position your body behind? Also of note was how the end of the shootout a LAPD SWAT officer used Urban prone and engaged the surviving mobile bad guy in the legs, which affected his mobility and allowed the officers to win.
Windows. Windows will have some form of “rake.” Rake is the angle of a window. Depending on your view of the target in relation to the window, will be if it’s the horizontal, vertical, convex or concave shape. There will be a slight rake found even if they appear to be straight up and down. Shooting from inside a vehicle out on a front window, the rake is down and away from the shooter. Generally the majority of the bullet will hit glass and go up. Shooting into a front window from outside (window goes up and away from the shooter) the bullet will hit glass and go down. Generally with a pistol, the Federal HST and Bonded Gold Dot JHP loads minimize how much the movement is, but they still move a lot. Why do round deviate these general directions? Path of least resistance. What round do you shoot? It doesn’t matter that much. Just shoot a lot and try to shoot around the vehicle (or intermediate barrier) instead of through it.
Picture of Rake:

How do we solve that? Something I had learned from a discussion with another forum member/mod was to create a port and assume that your first 1-3 shots will be used to create a port nothing more. Then through the port work your trigger and shoot. This was demoed in the class and it worked. Shooter from the drivers seat would lean forward towards the glass then shoot to make a hole then through the hole would engage the target. As this class was Patrol focused, handgun useage from inside was what was covered. In conversation with other P&S mods, I got the following info in regards to Carbine employment (*Petty might of covered this and I missed it FYI). Push your handgun as close as possible the window without the gun touching the glass. Shoot through the port the first shot creates. With a rifle, you can punch the muzzle through the hole after the first round and work this problem with a lot less issues.
The next demo was how glass and Buckshot interacted. A single round of duty buckshot (can’t remember the specifics) was fired through the back window of the demo vehicle toward the front window (Pontiac GT). No buckshot was located entering the front window. Due to the buckshot shattering the rear window doing the same drill again with a slug was not available but will be something I attempt to do on the range in the future. Of note new vehicle standards are putting laminate windows on the full set of windows not just the front, so you may not see this glass shattering and disappearing any more.
During this course many times Petty discussed the famous FBI UCR and Ballistic tests. Various aspects of the value of these tests were covered, as well as some disclaimers. The biggest was that only certain info was collected in each test, and some data can be skewed based on the dynamics of the incident. In regards to vehicle ballistics itself and bonded ammunition; When the FBI shoots the tests on the intermediate barrier, it is a small piece of glass without the flex and car frame that a real car window has. So some of the deviation seen is the result of real world testing vs. lab testing. This is why so much of the ballistics world is “generally” not “always.”
Day 2
Classroom:
Training:
Needs to reflect what we see in the real world. Negligence to our students to not ensure it’s realistic. One way we can check if our training is realistic is to view dash/body camera footage. We don’t watch the video just for entertainment; we watch it to learn from it. When watching the video, distance yourself from who wins or looses (cop or bad guy) and watch the tactics used and how the winner won.
When we show videos we should have points that we are pointing out to the students in the video. i.e. Injured Shooter, Cover, Movement, Lighting, Muzzle Direction, Communication, etc. Play it through without comment once then go through pausing the video to show what you are using as teaching points.
A discussion point on “Negligent vs. Necessary;” Shooting from the back of the stack forwards. Is it negligent or necessary to shoot from behind everyone else? Generally negligent. Watch many LE OIS videos or Critical incidents and you will see a lot of officers with guns out that shouldn’t be out. Even worse is when those officers are shooting. See the following video for an example of way to many guns out, and a lot of guns out that should not:
Miami and Fox News video:
Bad positions usually dictate bad decisions. By trying to ensure we have good tactics and constantly use them, allows us to be in position for the most choices and good decisions.
Some videos we see an officer get shot, however everything they did was textbook. We can’t always win, sometimes its just our turn to go. We need to include those examples in training so that people are able to recognize that and be prepared.
*I will be including the “Dark Truth” clip of Roland from P&S MODCAST in my training classes. *
Crowding cover. Sometimes crowding cover is good, other times it isn’t. Video shows in vehicle-based engagements LE generally crowds it. If they are doing this all the time, trained and untrained, why try to teach them something they don’t do?
Closer to cover, less reaction time/gap, harder to manipulate weapon, ricochets are a problem, less visibility/information. For the purpose of this focus, its just working angles. At DARC I learned to work horizontal and vertical angles in the house. Vehicles add the angles of the cover near and far, and also the angle of the adversary, such as high ground versus low ground.
Another factor that is common in LE vehicle work is to rush to the back of the vehicle upon shots fired. Nobody stays in the “tactical V” when shots are fired. Tactical V is a term to describe the gap between the opened door and the frame. Limited cover there anyways, so why not teach from the start for officers to move to the rear when they ignore all the “tactical V” training as soon as it goes south anyways? Teach them what they will do.
Mobility is life. If an officer looses mobility the greatest threat to their survival is the suspects mobility. Staying “high” and off the ground equals survival.
Closer to cover, the more efficient light usage will be. It allows the officer to push the light past the cover. More light, more info, ability to make better decisions.
Range:
From a teaching perspective, Petty included several teaching specific points. Some things were if you have time, teach it, if you don’t what can you cover via PPT or a dry run without shooting during in-service? Order of teaching, work from the car out, vs. outside in. We start in the vehicle most of the time we have contacts with suspects.
Started with dry runs on how to exit the vehicle – assuming that the vehicle was disabled and unable to “get off the X.” How to disengage the seatbelt and when was a talking point. Having approximately 18 cops from various parts of the US led to many discussions but all of us indicated that we were wearing seatbelts on shift. Various vehicle setups affect the ease of seatbelt removable. In my patrol vehicle I could not wear the seatbelt unless I have the “fat person extender” due to vehicle console layout. This does make seatbelt removal an easy factor for me ever since learning this from a John Chapman demo I audited in 2010.
After covering how to remove the seatbelt, we had a discussion of ready positions vs. muzzle orientation. If you are ready the gun is up and pointed in the general direction of the threat. If you are moving and have friendlies down range the muzzle shouldn’t be pointed at them. Many times on the square range people will use the “SUL” or pointed down at your feet position. In the real world, there is no one size fits all muzzle orientation. The Low Ready/Compressed Ready were discussed as the only ready positions we use with a handgun, as SUL and Temple Index were movement positions when having the gun in a ready position would muzzle people. Petty’s take on this safety rule is “have your gun indexed in the safest possible direction.”
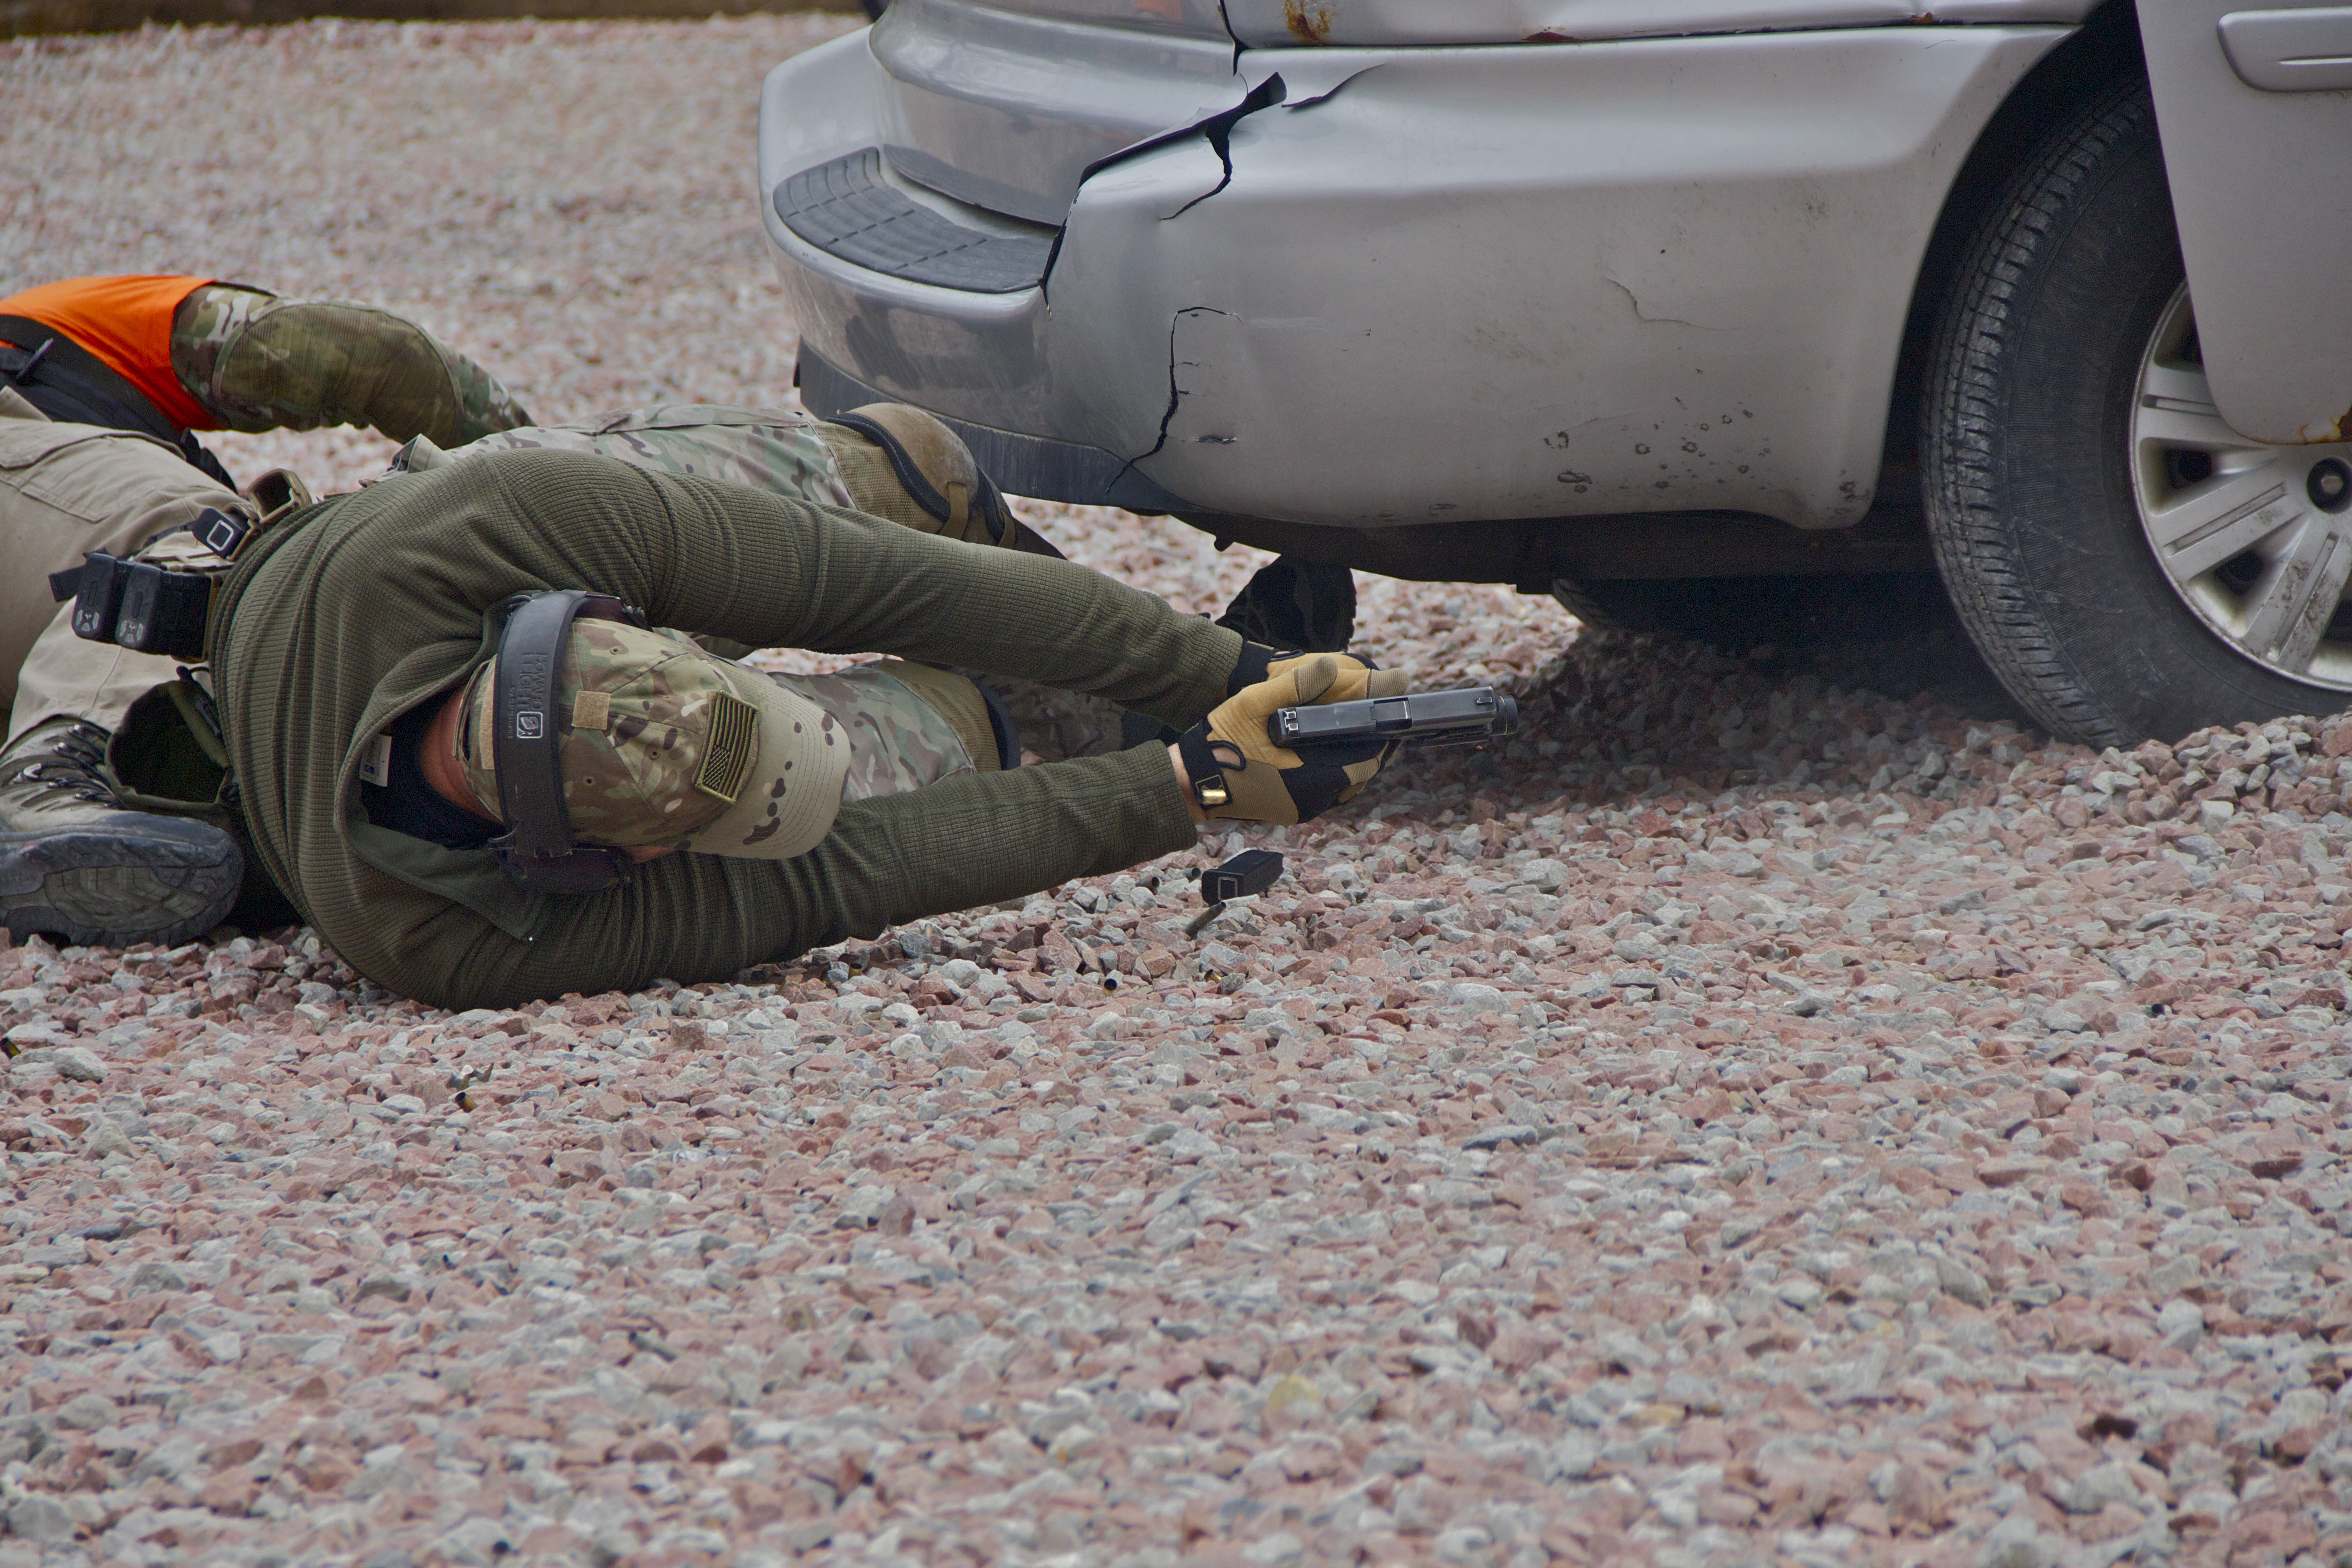
We did a few dry runs to cover how to exit a vehicle safely then to work the car to engage targets. A vehicle was parked on the range with a target in front of each front seat on the bumper and one on the ground just to the outside of the tires/bumper.
To get the maximum number of reps/training value out of limited time, two students with a coach per student were used on each rep. The students would be seated with seatbelts on and pistols holstered up. Upon informing coaches they were ready, the coaches would yell contact. Students were to get pistols out and get multiple dry reps of presses on a target through the windshield. After several reps the student should disengage seatbelt, open door and then move to the back of the vehicle. After getting to the back of the vehicle, students needed to work high then low. After getting low into urban prone the coaches would call “switch” and students would swap what side they worked the targets on. Muzzle discipline and communication became key and a task coaches had to be conscious of.
Petty’s thoughts on if the student should get out of the vehicle and run/sprint to the rear or walk backwards were a “depends” but leaning towards the thought that one should get the gun in the fight “sooner rather than faster.” It takes more time to get out and walk backwards to the rear to avoid tripping than to get out and sprint to the rear and post up. Shot timer evaluation he stated backed this up. The right answer is still METT-TC. Be able to choose the right option based on the situation at hand.
To get your pistol out of the holster from seated in a vehicle, Petty taught to drive/buck your hips up and forward. This should clear the butt of the gun from the seat. Its also possible depending on vehicle seat and seatbelt interface that a twist of the gun away from the seat is needed as well.
Drills were preferred vs. Scenarios. Generally you are teaching experienced cops, or cops who have actually taken calls for service vs. new recruits at the Academy level. Drills cover how to apply X. So a drill that covers how to use cover may have 6 targets to engage. Un realistic to engage 6 targets in a CONUS LE environment? Yep. However, the drill is working on moving in and out of the cover positions and engaging the targets.
Live fire started with two officers in one vehicle. Officers would engage the threat to the front then exit and engage the targets from the back of the vehicle. After engaging targets 2-3 times from prone Coaches would call switch. This was done approximately 2-3 rotations.
Next the “malfunction stick” was introduced and explained. The why it’s used and how to use it. In a typical shooting class, when malfunctions are taught it’s a very static environment. We tell the student to set up a type 1 malfunction and on fire to attempt to fire the gun, fix it then fire again. This is repeated for the various malfunctions. The downside to this is that the student only sees the malfunction in a static “I know what I just set up” environment and stays still.
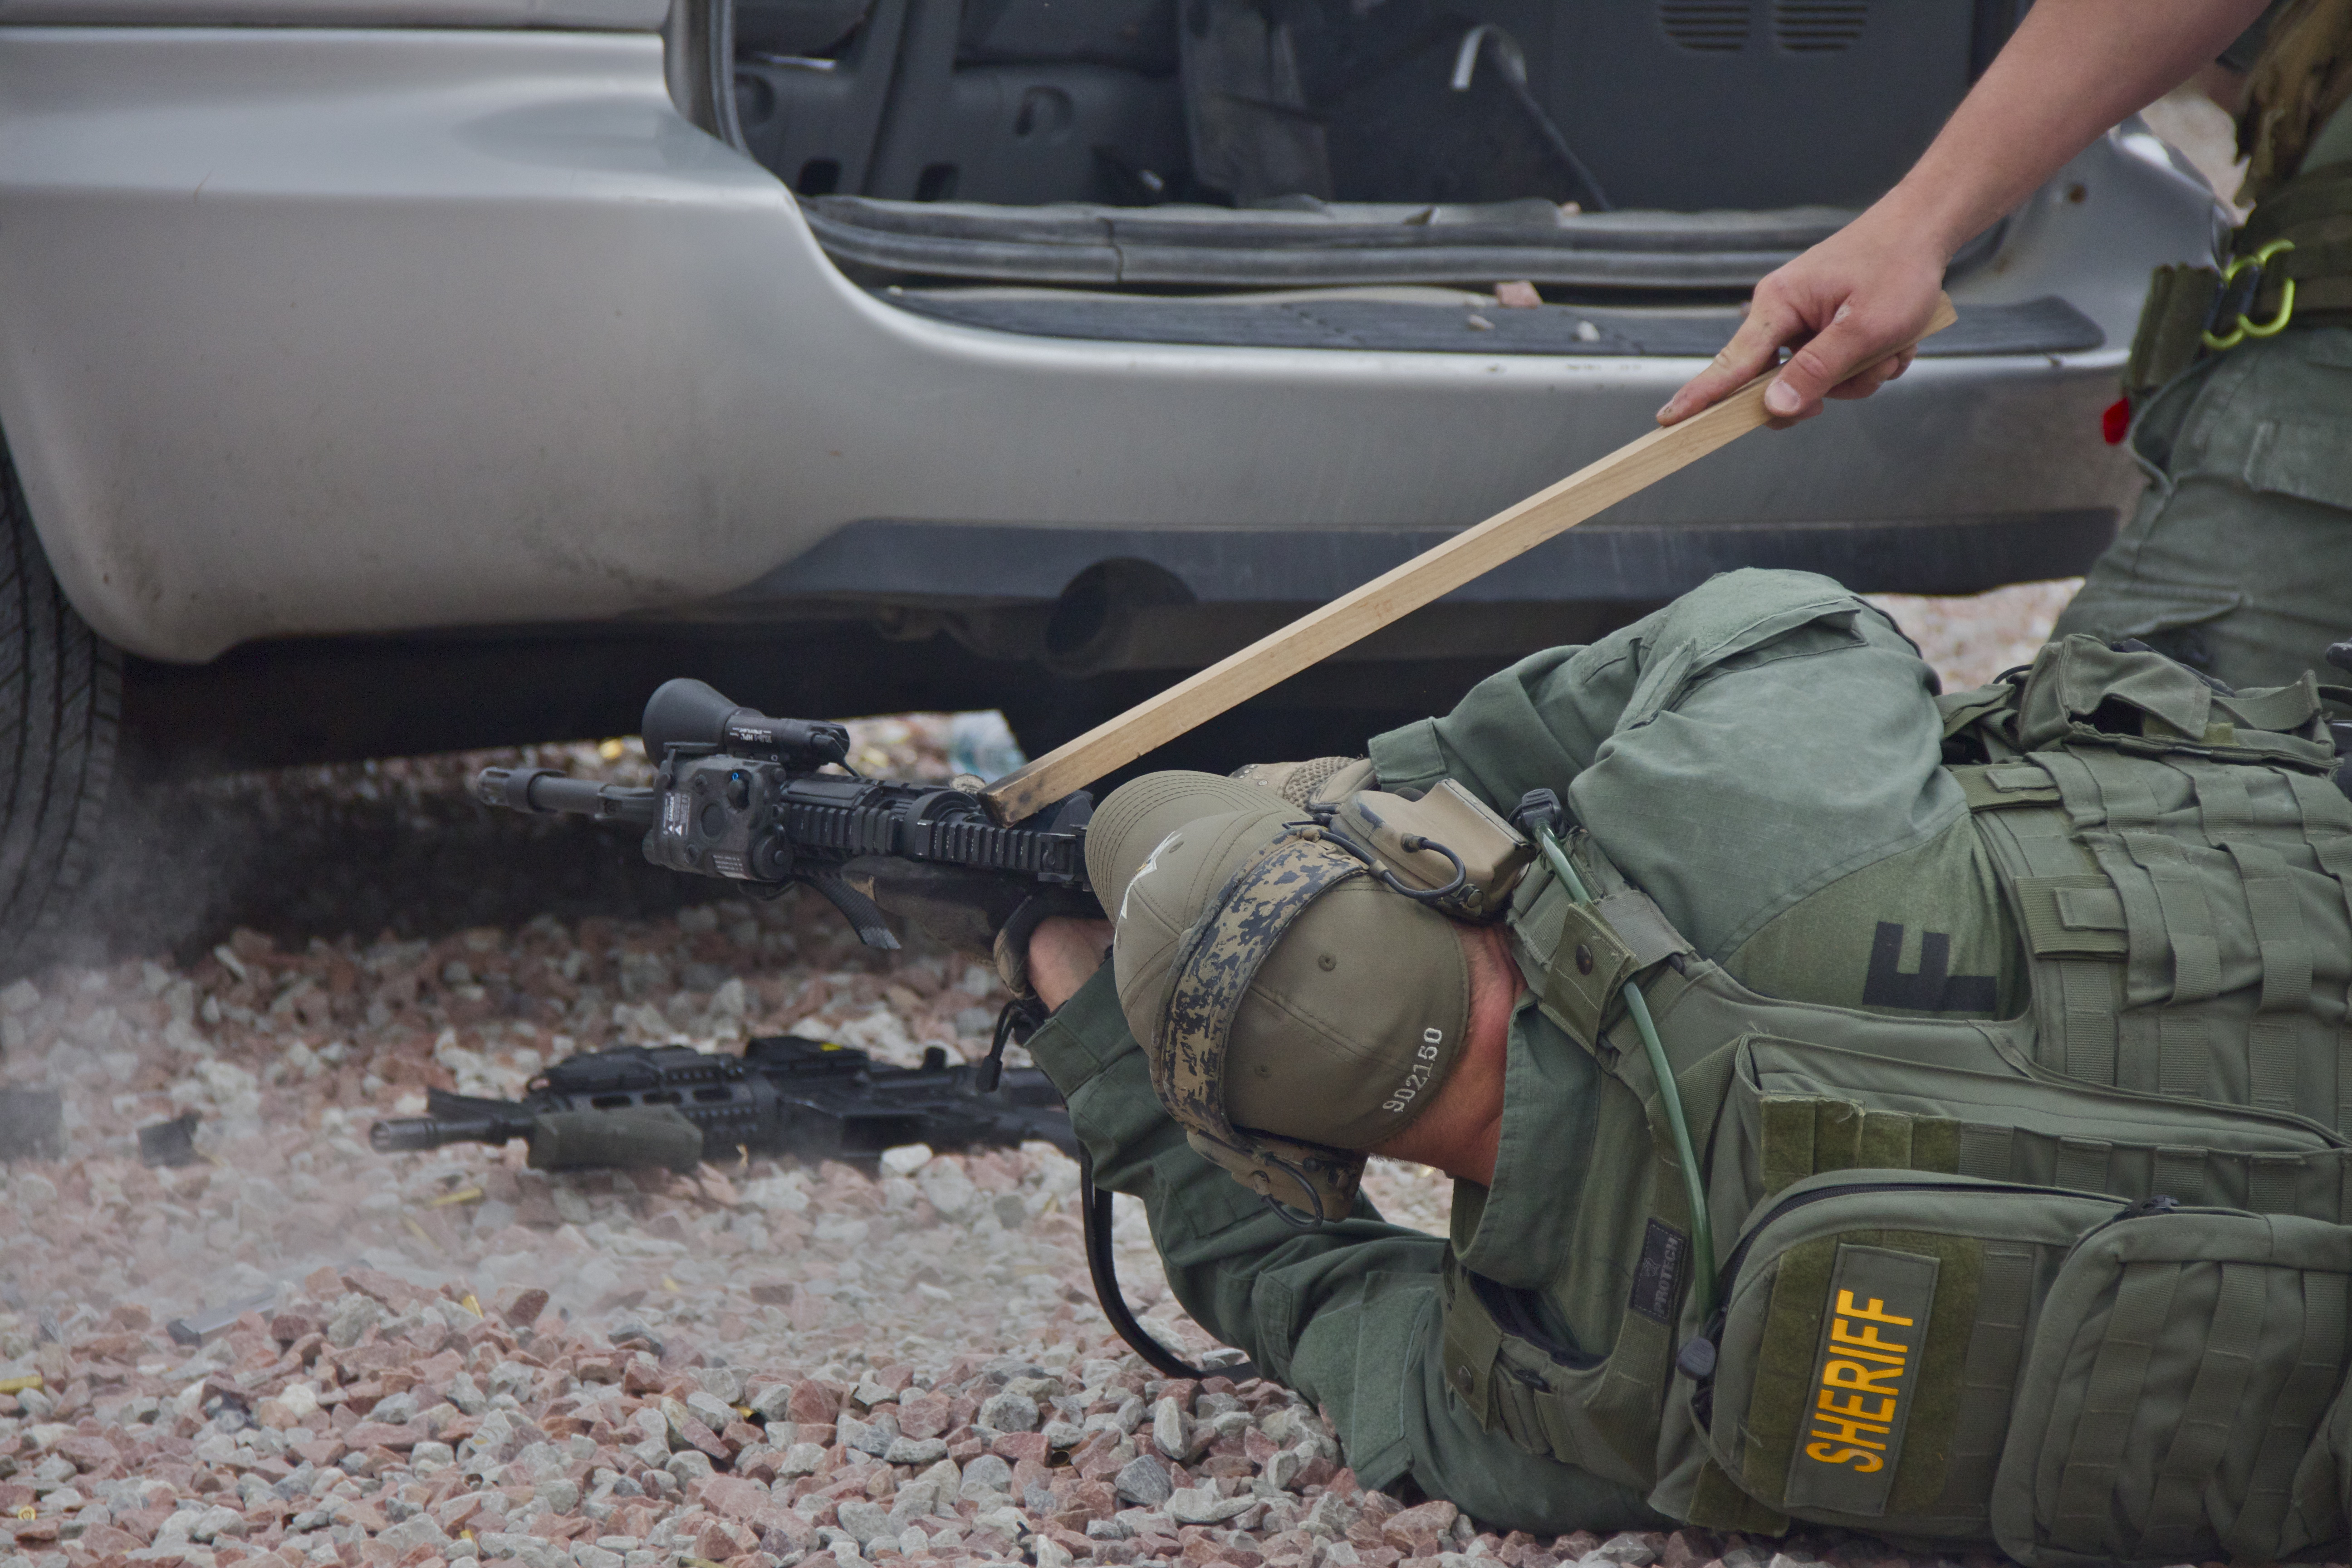
The malfunction stick – short piece of 1×2 – is placed over the ejection port of an AR-15 rifle. This causes brass to go back into the ejection port causing all sorts of malfunctions. Many of these malfunctions I had been taught before were “catastrophic” in nature and required tools to clear. After completion of this course of instruction I now take “catastrophic” to mean broken parts. If no parts are broken, you can clear it, it just takes working the gun.
This also works on a pistol. Hold the stick with the blunt end behind the slide of the pistol stiff enough to cause the gun to not fully cycle. Of note, this did cause my Glock slide plate to move slightly not allowing the gun to fully return to battery. Easy fix, but something to be aware of.

To break it down, you have two malfunctions with an AR-15. Click instead of bang and everything else. Click or Type 1, you tap rack keep working. Anything else is a dead trigger. To clear it, unload the gun bringing it to a neutral state, then reload it. First you attempt to place the gun on safe if at all possible. Then remove the magazine. Then lock the bolt to the rear. This may or may not work depending on if there is a brass over bolt or similar. To get around this, orient the muzzle down, press on bolt catch and pull charging handle to the rear. Upon getting bolt lock back, karate chop the charging handle forward. This may take several iterations if the brass is wrapped around the front of the BCG. Finger sweep the chamber from the magazine well. Run bolt forwards, then insert magazine, charge rifle up and re-asses work.
The use of the malfunction stick allowed organic malfunctions. The organic nature allowed the students to see quickly how/when they need to transition vs. clear a malfunction. As a side note, interestingly some students noticed the stick being brought into play, others did not. I think this was a result of how stress inoculated students were through other training. DARC was a non-stop stress inoculation event and so far anything else I’ve done has seemed to lack in stress. The organic nature of the malfunctions in a drill is similar to the principle of the Three Little Kittens drill seen by VTAC and Mike Pannone’s blindfolded malfunction drill. You get what you get and you have to clear it by feel.
Next drill. 2 officers with handguns in vehicle. Their rifles are secured in the trunk of the vehicle. For purposes of training, do not have the trunk locked or require getting of the key to open it with 2 officers. To many times officer will forget a key and start to run back down range to get the key as the other officer is shooting. If you build in dry reps prior to live fire and wish to run it that way, great, but for teaching the goals of the drill Petty didn’t want to do it that way.
As soon as students have secured rifles in trunk, coaches will “mess with” the rifles. This can be turning optics off, folding BUIS down, setting up malfunctions, sling removal, etc. Remember that some officers do not check the status of their rifle before going in service each day.
Upon fire the officers engage high targets then move to rear of vehicle. Should use communication to ensure they both don’t go for long guns at the same time. As soon as a long gun is up in the equation, the other officer should be going for his. Also the coaches need to do a switch and have them move sides while being muzzle aware. Ensure malfunction stick gets brought into play as soon as officers get shots off with the rifle. This allows for the maximum reps in a short duration drill. The same footwork I learned for using cover at DARC (threat side foot forward) was applied here.
Next multiple vehicles were used. Each vehicle was its own drill/vehicle to work, not an “assaulting across a parking lot” drill. Allowed for high reps in shorter period of time from a teaching standpoint. If you have multiple vehicles available, have each one facing down range at a different angle. This allows officers to work the different angles and cover types offered.
As they approach the vehicle they should have the proper muzzle orientation – if approaching a threat vehicle muzzle should be a ready position and should be spread out. Just like in CQB in a house, first open door, we take, so is it upon approaching a vehicle for a vehicle assault. We hit the first point of cover and should dominate it. Sooner to get a solid shooting platform rather than faster.
To mix up the targets, add some pants filled with cardboard legs behind cars. Allows officers to see what they might see if prone under a car. Reinforces mechanical offset.
Day 3: Low Light
Classroom:
DOJ COPS release – Ambushes of Police – 2015.
FBI UCR
NYPD SOP-9
60% of OIS involved vehicles
70% of OIS in low light conditions
Statistics show these are the majority of OIS so majority of our training should be focused to win them. Instructors need to know the info to ensure training is realistic and why you need to do this training. Helps when justifying it to administration.
Force Science Institute – 2013 – Passenger Side Approaches are safer. 60% increase in officer survival. –
https://www.youtube.com/watch?v=irPrIAVnjqU
See this video of the officer who won a passenger side approach traffic stop turned OIS.
Also of note is how he stayed “FBI” with handheld light.
Works the angles of the vehicle while staying crouched.
When it was time to move to better cover, he moved.
Data. When using data to back up our reasons for things, Petty suggested we need to use relatively recent information (last 5 years). This ensures it’s being relevant to what we are teaching. This doesn’t negate the knowing historical events (FBI Miami Shootout for example) but his opinion was don’t let a 1986 event dictate 2016 tactics. Of note a counter point to this that I agree with: “History repeats its self. Tactical fundamentals are the same historically to keep us alive. It is how we employ the fundamentals based on the circumstances; terrain, vehicle or structure is where we evolve.” Lane
Sometimes a SOP may be something that is verbal tradition aka “what we have always done.” This doesn’t make it right, prove why using hard facts.
Videos – show a mix of videos both good and bad. However we should end with good videos each time. A video where the officer did the right thing and won the fight.
Jared Slocum video – muzzle orientation, self-aid, orientation of body toward cover while utilizing the only available cover, self-extract. Lack of any other traditional cover around.
Reckless vs. Aggressive. Sometimes students will see videos or hear lectures where they are told be more aggressive to win the fight and then they go and do a FOF evolution while being reckless and get “killed.” A good way to cover this is to show video’s demonstrating reckless vs. aggressive action. Reckless endangerment is bad. When its time to flip the switch and be aggressive, its time.
Range:
Low Light – to many light techniques around. Teach a handful and call it good. FBI, Temple index and Harries. All 3 are needed to work around a car or cover. FBI or Temple is a variant of how officer vehicle approaches begin.
Cars as cover at night and training drill setup: We want to work off the car until able to get to a better location or form of cover. When setting up drills we want to try and make a few drills were you initial contact wise work off the car then move to better cover.
Theory:
All low light discussion is theory. This class is patrol focused, so no NOD’s covered. All handheld and weapon mounted light usage.
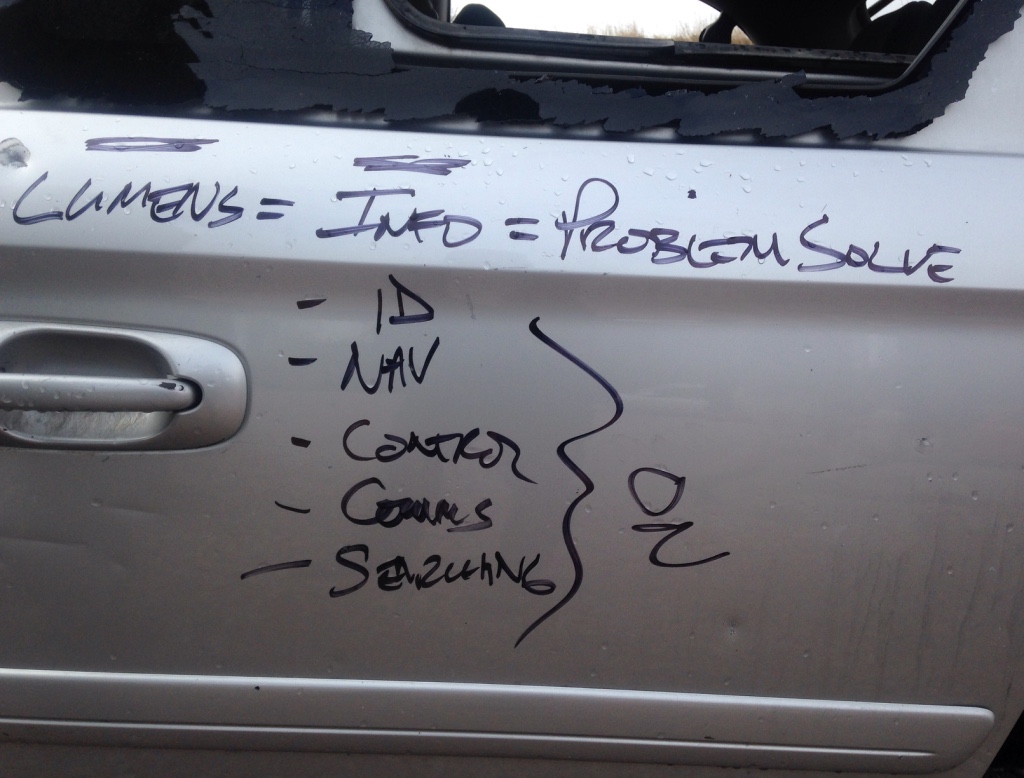
Lumens – a measurement of light output
Info – what we receive by having Lumens activated or turned on.
Identification
Navigation
Control of suspects
Communication
Searching
Problem Solving
Keeping the light on is a good thing. You can’t see what you don’t see. The old “light on, light off, move, light on, engage” mantra is akin to opening your eyes, seeing a threat, closing them, walking away, opening them and reorienting yourself to the threat. Keep the light on and work. You can know when you do and don’t need your flashlight on based on the situation. When you turn a light on and off, it takes approximately 30 minutes for your eyes to return to low light maximum capability.
Low Light malfunctions. Easier to clear for me. It was all by feel. Couldn’t see what it did, so I just went through the steps and got my gun running again. For a teaching aid, during low light training you can do static malfunction work and walk up and down the line using the malfunction stick. This is where teaching the CLICK and DEAD TRIGGER is important. The gun talks to you when this happens and you do not need to look at the gun to fix the malfunction. I teach this method in my courses. Practice this stuff and teach your dudes this!!!!!
Range safety at night. Chemlight on front and back of all students. Ensures no matter orientation of student to firing line, you can see light and know students down range.
For instructors, coaches a variable output headlamp worn around the neck turned on low allows you to see what the student is doing and ensures muzzle orientation is safe. With the constant on off of high output lights you are not affecting so called “night vision” of the students eyes.
Day 4:
Classroom:
Videos- always check your 6. Officers can come up behind you and be shooting as you start to stand up. Constantly checking situation enhances survival. You are always responsible for your safety.
Regarding shooting through barriers: Is there a suggested number of rounds? Yes, all of them. Due to energy bleed off and bullets being broken apart you loose effect on target so apply P for plenty.
Range:
Alphabet Soup.
One vehicle, with approximately 15 targets. A mix of paper and steel. All targets receive a number or letter, no duplicates. You can scale this drill up or down based on student capability and time, just like Pat Mac’s Scrambler. Steel is there to ensure students do not get lazy with accuracy. If the range will allow it – berm coverage, 180’ fire ability is ideal to allow constant scanning and keep it close to realistic. Use the malfunction stick. Instructor will tell student when to use cover and get rifle back in the fight. Student can only shoot the last threat called, and must shoot the threat from the proper shooting position – i.e. prone targets will only be engaged from urban prone.
This drill is not a 1 officer vs. 15 ninjas drill, it’s a drill to force the officer to scan near and far looking for a target and how to engage that target from behind cover. The instructor should call out targets in a rapid fire constantly changing manner to ensure they move, and sometimes just as the student locates the threat, call out a new threat. This is realistic as sometimes as we will go to engage a threat and then they become compliant and engaging the threat would be murder. Each run should be approximately 3 minutes in length.
The factors of this drill are all artificial stressors to see if the student can apply the lessons learned so far. Can they scan near and far. Do they utilize cover properly? Can they transition when weapon goes down? Fix malfunctions? Listen to what is being said with rapidly changing many times confusing and contradictory information? Do they get fed up and give up? Do they shoot when no longer allowed to shoot? Teaching wise you can change this drill up or down difficulty wise based on time, student capability, etc.
Video the students as they go through. When I went through I thought I was squatting to minimize exposure through windows while searching for threats. Video showed I was not.
Here is my run through “Alphabet Soup:”
FOF – after lunch was FOF evolution. Safety protocols were followed and explained to ensure a safe weapons free environment. No body armor was allowed to be worn to ensure you knew when you got hit.
Drill was called “Dueling” and was done with one vehicle. Each officer started at opposing wheel wells – 1 front one rear – hands on the car. On fire, draw and engage the other officer. First officer to make hits wins. Each drill needed to take into account the limitations of FOF munitions while taking advantage of the positives. As such each drill needed to be a High Intensity, Close Range Gunfight.
9 out of 10 times, students who started at the back of the car won the fights. Generally we as students/instructors observed it seemed to be the better height of the cover/concealment available to the officer at the rear. After one run through, all students should do it again, support hand only. Then try it again, only one student – back of the car – on their knees. Will show why mobility and when to be aggressive wins.
Classroom:
Teaching/Instructor Points:
Break down the topic of VCQB into skill sets:
Ballistics – what is and is not cover
Positions – Standing, squatting, kneeling, urban prone
Weapons Manipulation – Muzzle, Malfunctions, Injured Shooter
Low Light
Movement – individual and team
FOF
Communications
Theory/Numbers – theory is not scientific but has some in it
Inside the car out
Outside the car in
To teach this, you will never have enough time.
Break down what is a priority to teach, and then add as you have training hours.
How to maximize time: Example – shooting positions. Everyone shoots standing and kneeling in training. Focus on squatting and urban prone. You can cover ballistics using a classroom PPT/Video combo. Have students do this before attending the class.
Teaching wise, everyone will disbelieve the vehicle ballistics until they see it. It really should be demoed to the class. No two vehicles perform the same, but still needs shown.
Students taking this class:
Should have gun handling up to par. Bring duty gear that can get muddy and possibly damaged as you will be flopping around on the ground no matter the conditions. Bring a Rite in the Rain notepad and appropriate writing instrument to take notes with. Due to inclement weather I didn’t take notes till after class or in the classroom each day which didn’t ensure I got every noteworthy takeaway.
Don’t attend if you have not taken a basic instructor development class as well as various pistol and rifle classes. This ensures you are who the Instructor class is designed for.
88 Tactical’s Facilities: This was a very clean, comfortable place to stay. The lodge is a 18 room bunkhouse with 4 showers and clean 1st world bathrooms. The kitchen/bar is a great place to hang out and share info each day after class. Obviously a concern as a cop is the name and logo of 88 Tactical. In short it is the result of the owners LE service in Nebraska and “Signal 88” being a Nebraska police code meaning “all’s clear.”
Comments
So empty here ... leave a comment!