

Technical-manual warning: Thermal sights, laser boresights, weapons, mounts, and adjustment procedures differ. Use the current technical manual for the exact equipment, follow laser-safety and range-control requirements, and confirm alignment through the prescribed live-fire zero. A boresight is an initial alignment—not a final zero.
Thermal sights require a target and procedure that both the thermal sensor and the boresighting system can resolve. The original 2017 article referenced TM 9-5860-226-13&P and a particular laser boresight and thermal-sight combination; those instructions should not be generalized to unrelated equipment.
Prepare the complete system
Before aligning the thermal sight, verify that the weapon is clear, the mount and sight are correctly installed, the prescribed boresight has been checked or calibrated for the weapon, and the correct offset target and adjustment data are available.
Secure the weapon in the most stable approved position possible. Movement introduced during the procedure can be mistaken for sight error.

Create a thermal point of aim
A plain paper target may provide little or no contrast through a thermal sight. The equipment manual may prescribe a heated, cooled, reflective, or otherwise thermally distinct aiming reference. Use only the target method specified or approved for the device.
The historical method illustrated here used a target assistant to create a visible thermal reference near the prescribed aim point. Current users should not copy that technique unless it appears in the controlling manual and can be performed within current laser and range-safety rules.
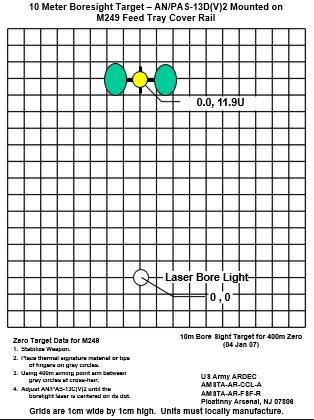
Coordinate and adjust deliberately
Where the manual calls for multiple personnel, establish clear commands before activating a laser or making adjustments. Keep everyone outside prohibited areas and control the weapon and laser according to the applicable safety procedure.
- Stabilize the weapon on the prescribed point of aim.
- Observe the boresight indication and thermal reference using the approved method.
- Make only the adjustment specified by the manual.
- Allow the display to refresh or cycle as required by the device.
- Repeat until the prescribed relationship is obtained.
- Record the configuration and proceed to the required confirmation or live-fire zero.
Confirm rather than assume
Mechanical alignment can be affected by mount position, tolerances, ammunition, environmental conditions, display calibration, and movement during setup. Confirm the result at the distance and with the ammunition specified by current guidance.
The enduring lesson is procedural: use a calibrated reference, create a target the sensor can resolve, stabilize the complete system, make documented adjustments, and confirm the result. The exact offsets and steps belong to the current technical manual—not memory or a generic online diagram.