Zeroing the Close Combat Optic (CCO), Part 1:


We are continuing our discussion on the M68 Close Combat Optic, or CCO. The reference for this is TM 9-1240-413-13P dated May 2013, and TC 3-22.9, Change 1 dated January 2017
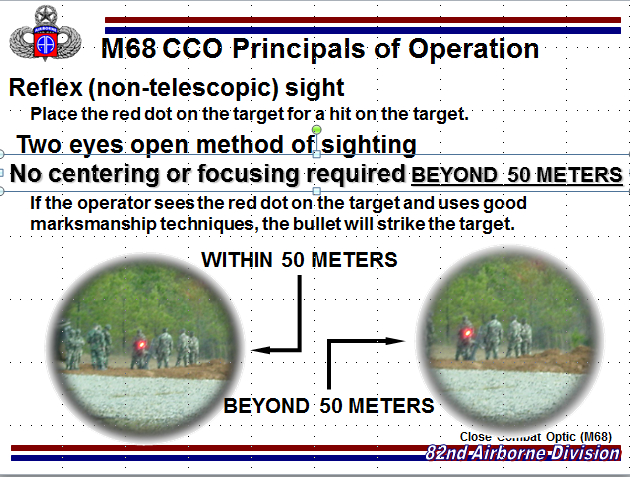
To recap our discussion from last week, the close combat optic (CCO), M68 is a non-telescopic (unmagnified) reflex sight that is designed for the “eyes-open” method of sighting. It is the sighting system for the M4/M16 family of weapons with the highest population across the United States Army.
To Zero the M68, we have to ensure that it is mounted properly first. For this discussion, we will be talking about the Comp M2/M3 Variants. As you can see in photo two, the optic is placed on the rail with the front end of the rail mount flush with the upper receiver. The reason we want it here and not closer to the firer is because the CCO is a Reflex sight.
Reflex- or red-dot sights, are designed to be fired with both eyes open. This increases the Paratrooper’s depth of field and perception of cues in their sector. The CCO is designed to be parallax-free at distances exceeding fifty meters. Parallax is the apparent shift of an object. An example can be illustrated by holding up your hand with the index finger pointing up, close one eye, then rapidly open and close the other eye. Your fingertip will appear to have moved, even though no movement has actually taken place. That apparent shift is parallax. The reason that this is important, is because Parallax can make the target or reticle appear to be in one place when in reality, it is in another. Accounting for this is important when engaging targets at distance.
M68 CCO should be placed on the rail where the best field of view is achieved. The farther away the M68 is mounted from the Paratrooper’s eyes, the more the Paratrooper’s Peripheral vision comes to play. The recommended location is with the front end of the mount lined up with the front end of the upper receiver. Picture two shows this.

As mentioned in our previous post on the CCO, it is recommended that it be zeroed and fired with both eyes open. It takes practice to get used to the two-eye opened method. However, once this is accomplished, your field of view will increase and your target acquisition time will decrease.
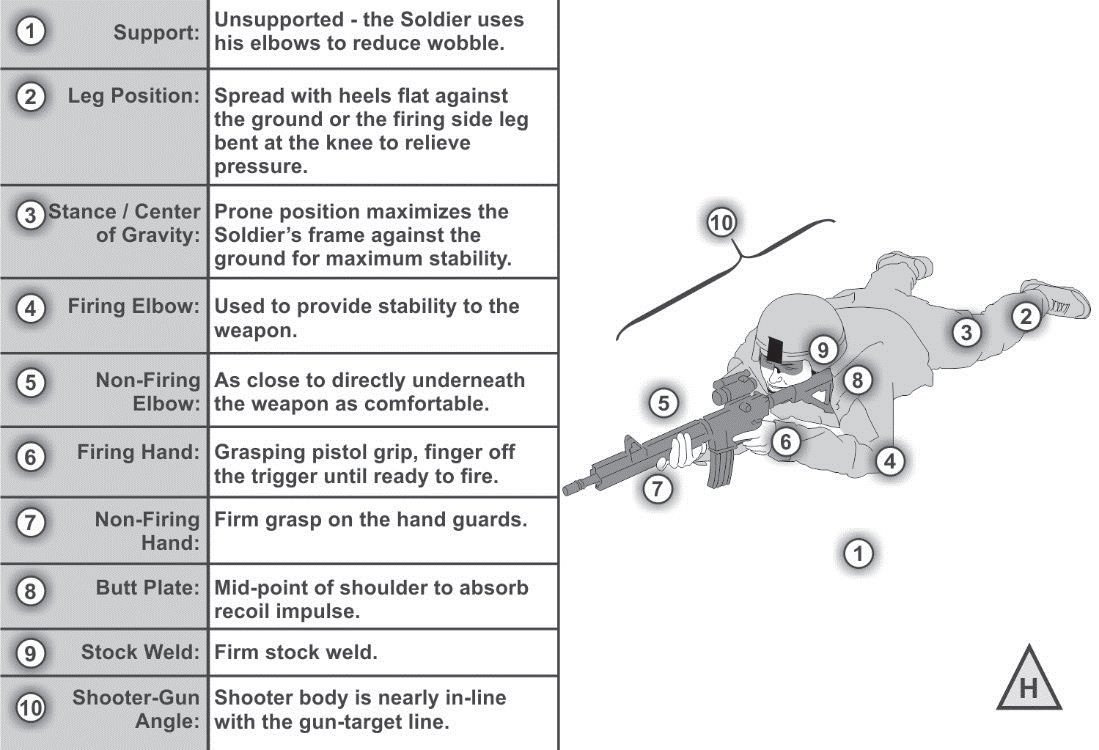
It is important for Paratroopers to go through and assess the unique application of the functional elements to the CCO for their shot process. It starts with building a stable platform to shoot from for zeroing. The Prone Supported, or Prone Unsupported with a magazine resting on the ground and sling wrap incorporated are the best positions to do this from. Pictures three and four illustrate this.

While aiming, there are two key components that we are focusing on: sight alignment and sight picture. The Paratrooper needs to remember that a consistent cheek-to-stock weld is an important part of getting good sight alignment with the CCO. Sight Alignment for the CCO means the Paratrooper centers the dot vertically and horizontally in the tube. This is due to the Parallax mentioned earlier, as we zero the CCO within the 50 meters mentioned for the CCO parallax-free. Picture five illustrates this.
Sight picture, if you recall, is the incorporation of the aligned CCO Dot with a target. Picture five, within fifty meters, illustrates what this looks like. If you are coaching a Paratrooper, and they have a large group spread across 8 MOA or more, The Primary cause is more than likely an inconsistent sight picture due to improper sight alignment or changing cheek to stock weld.
While there are some personnel that say it is important to ‘train as you fight,’ or that a Paratrooper’s zero shifts when their kit is worn after zeroing slick. TC 3-22.9, appendix E, states that “Adding combat gear to the Soldier’s body does not cause the sights or the reticle to move.“ This means zeroing is an administrative function, rather than a tactical function. You zero the weapon to perform the tactical tasks of engaging threat targets.
So to sum up, We discussed how the shot process is applied to the CCO for zeroing. Next week we will continue our discussion on the CCO, as we discuss how to use the new MCOE approved Zero Target to conduct Table IV: Basic with the M4.
#weaponsmastery #CCO
Comments
So empty here ... leave a comment!