Rattle can paint jobs

Austin Black

Amateur
Thinking about painting my 6920. I'm going to use rattle cans so that's what I'd like to see. I don't have a painted AR so I can't start the thread. Thanks!
 

A910

Member
New (don't ask about the TRS-25) 2 tone
LZHY1ecy


After a bit of rough use for a couple weeks.
gr8QjrAP

The wear on the stock is mainly from chin and cheek stubble. ( I apologize, I don't run with an operator beard. I don't get to sit at the cool kids table ) It held up moderately decent but honestly it isn't meant to be permanent.

edit: Forgot to add in that the pistol grip was added on later after the previous grip's finger grooves pissed me off. The wear on it is only about 2 days worth of moderate training.
 

karmapolice

Amateur
16396176616_e7b9a3ac79_h.jpg


Finished the 12.5" SBR the other day need to take pictures of it as well, it's still missing some key parts though such as light and sling.
 
Thanks Austin. I did design and cut each stencil by hand. To be honest, I didn't even know it was going to for sure turn out so good until I pulled everything off at the end before clear coat.
 

karmapolice

Amateur
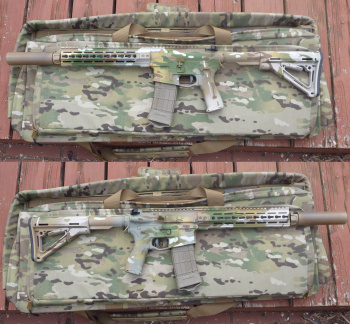
That's a sweet setup and paint job!

Thanks, I've been through many iterations to find what works the best for me. One day I will have to modify my light set up if I ever get to own/issued NVG and a need to run a laser. I need to get pictures of my other SBR but it's about the same just a comp m4s, 10" KMR, 12.5" bbl, a magpul pro rear buis, an SD-E instead of C, and will be rocking a scout light for a try.
 

Default.mp3

Established
most of the spray paint multi cam I've seen looked like shit, but this is badass! Did you make your own stancil?
Multicam really isn't that hard, IMO, it's just tedious and time-consuming because of all the colors, as you'll have to let the paint cure between each layer. However, if you're patient and have a good swatch to work off of, a decent reproduction is pretty easy.

My first attempt ever, and I'm not happy with the pattern on the ejection side and some of the coloration, but those are easily enough remedied for my next attempt:

Homemade stencils created from painters tape and wax paper, shapes traced from the rifle bag. 8 different colors, all Aervoe: desert sand, earth brown, dark green, light green, earth yellow, light coyote, light tan, and khaki.

For the future, I'd still stick with Desert Sand for the cream splotches. For the dark brown splotches, I'd use Earth Brown misted with Black (Earth Brown by itself is too light, and Aervoe doesn't have any dark chocolate colors). Next layer, I'd used Earth Yellow (misted with Light Green), and Dark Green. Final layer I'd use Earth Brown (Coyote is a bit too light, IMO), Khaki, and Light Tan. Negative stenciling to generate the patterns.

The real trick that most people seem to miss is that within some of the layers, there's some areas with hard outlines and some with a gradient, such as the Dark Green and Earth Yellow/Light Green layer. They're both on the "same layer", but you'll see how there are some places where there's a hard line between the two colors, and other places where it blends together. Same thing for the "top layer" with the various browns.
 

Bourneshooter

Blue Line Sheepdog
This was the first paint job I ever did. Krylon. Repainted it to be more "brown" due to my A/O changing to the desert. 102_5280.JPG


The next AR I painted was a "multicam" attempt. I cut templates following a bulk piece of Multicam using Arvoe and Krylon. I didn't like the results of the Arvoe paint over Krylon FWIW.

431519_10150712911924254_737869253_11114061_518135852_n.jpg

The last paint job I went back to the bigger splotches vs micro patterns as I felt that it blended better for the size of an AR to have bigger splotches over smaller patterns on it. I would compare the two overall pattern types to a ATACS vs Multicam.

DSCN2506.JPG
 
Top