


Bedouin2W
Newbie
Night Vision 101
So you are considering buying night vision, your department is considering purchasing NV, or you are about to get issued NV…
Here’s some basics:
There are two types of ways to use NV: head mounted and weapon mounted.

I would recommend a head mounted NVD with an IR pointer/illuminator as the best COA. This allows you to navigate and use your weapon effectively without having to move your device. If you can afford it, have a NV clip on and a head-mounted NVD.
Single Tube units: PVS-7, PVS-14, Mum-14

Although it covers both eyes, a PVS-7 is a single tube unit. The image from the “tube” is split over both eyes, giving you the same night vision angle of view as you would have with a PVS-14. Because the PVS-7 covers both eyes, if your device were to cut off for any reason (dead batteries, other device failure, or a built in safety trips when your tube receives a high amount of visible light from a flash light, flash bang grenade, headlights, or whatever…). You can navigate with both eyes covered, but it is different than just navigating with one eye covered. Personally, I would never pair up two PVS-7 users as drivers/vehicle commanders or assistant drivers in the same vehicle. Also, the PVS-7 isn’t practical for any behind the optic weapon mounting set-up
A PVS-14 is a single tube unit that only covers one eye. You want this to cover your non-dominant eye. The advantages this has is you get the same field of view from your NVD as you do with a PVS-7, but you still get to see natural out of one eye. If your device were to cut off you would not be in essence blindfolded by having both your eyes covered with a non-functioning NVD. Going back to the driving under NVDs situation, if the driver had a PVS-7 and it were to shut off, the TC or AD would still be able to take the wheel and steer the vehicle safely while the driver addressed the issue with his NVD.
A MUM-14 is basically a smaller PVS-14. It is not as rugged as a PVS-14 but it weighs less.
Dual Tube units: PVS-15, PVS-23**, PVS-31, DTNVG, Sentinels, Mod-3, RNVG, Bridged PVS-14s, and many more.

If you’re lucky enough to have these issued, fantastic. If you are planning on purchasing a dual tube unit, well congrats about being frugal enough to save for them, you get that bonus from work, sorry about your relative dying but leaving you an inheritance, or whatever financial windfall you have. These are more expensive than single-tube units. Dual tube units are about twice as expensive as single tube units- all things being equal in tube quality. The big thing to keep in mind with these units (aside from tube quality which I’ll discuss later) is that they essentially do the same thing, just the different variations offer different features. Most of these terms are not unique to dual tube units, so if you know you won’t be issued a dual tube unit or can’t afford it, still pay attention to this, and this is a good time to cover some basic technical terminology:

So back to the variance in the Dual-tube NVG units, some are compatible with external battery packs or power supplies, some have one battery unit for both tubes, and some have a battery unit for each tube. If I had to rank them in my preference: I’d go with 1. External Battery Pack, 2. Integrated on board battery unit, 3. Separate battery units per tube. That being said, there are still situations where I would choose an integrated battery unit over an external battery unit. The housing is different in these different dual tube devices. Different types of polymers or metals are used depending on the device. If you are buying a dual tube unit, you are going to be dropping a substantial amount of money, so do your research about each device
Tubes- Okay, here is the heart of the device. I could lose people in the technical detail of this so I am going to be brief about this. The two big things you need to look at when choosing a device are the Generation of the tube or tubes used and see if it is a green tube or a WP tube.
1. Generation of tubes- To be perfectly honest, I would never buy or recommend anyone buy anything less than a Gen 3 device for anything I would use on a two-way range. Gen 2+ tubes are okay, but they require additional IR illumination and if you think the opposing force/target/whatever has NVGs, they’ll see your IR illumination with any Generation of NV, to include the cheap ass Amazon Chinese made night vision. If you just want to shoot steel targets long range at night or shoot coyotes, Gen 2+ is great for that. I plan on purchasing a Gen 2+ clip on eventually, so they do have their uses. Don’t even waste your time and money on Gen 1 or Gen 2 NVDs.
2. Green vs. WP- WP is the new hotness, and with damn good reason. I have substantial time under green tubes and eye fatigue is real. After 4 hours, your eyes start hurting. If you have to lift up your NVD or close your eyes for a 10-15 seconds to give your eyes a break that is time you may miss that target leave the location. If you’re in a potentially lethal environment this might have even more catastrophic effects. Green works, but understand the difference. WP tubes have a light green/blue hue to them opposed to the green on black from traditional green tubes. If you can afford it, buy WP tubes.
There are places that offer Gen 2 WP tubes. At the end of the day, these are still Gen 2 tubes. I’d rather have a Gen 3 green NVD over a Gen 2 or Gen 2+ WP NVD. The trade off in image quality is not worth the reduced eye fatigue.
Now is a good time to talk about helmet and head mounting methods along with the basics of attaching a NVG to your head mounting system.

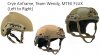
Helmets: You have ballistic and non-ballistic (or “bump”) helmets. There are different cuts available and I’m not going to cover this in too much detail at this time. That is better for a follow on post. Helmets allow you to mount IFF markers, such as IR flags, IR chemlights, or reflectors, counter-weights if you have a heavy NVD, mounted ear-pro/comms to your helmet, and IR illuminators designed to brighten up your immediate area.
A real quick thing about counter-weights: if you are using a PVS-14 with a ballistic helmet, you probably don’t need a counterweight. Also, any external battery pack can be used as your counterweight if you are using a dual tube NVD. I use a counter-weight on my bump helmet with a PVS-14, but others do not.
Other head mounting options- There are basically two categories for this: The surplus NVG head mount (AKA “Skull Crusher”) and non-traditional options.
There are three standard interfaces to connect your device to a mount: Bayonet (AKA Horn), Dovetail, and ANVIS**. The PVS-23 is an ANVIS unit and ANVIS units are a little bit unique. I do not know if any ANVIS mounting systems are compatible with the non-traditional COTS head mounts I listed above. While ANVIS mounts have been used by USSOCOM, they are primarily a mounting interface for Aviation guys. Unless you’re already deep into ANVIS mounts and interfaces, I would not go this route. A positive about ANVIS is because they are designed to be Aviation goggles, they have an external battery pack.

The bayonet interface is standard interface. It works but there is going to be wobble with your device on your head. I do not know of any dual tube NVDs that use the bayonet interface, but the PVS-7 does and it is built into the unit, so it’ll be very difficult to change that out. If you’re using a PVS-7B or PVS-7D, you’ll likely need bayonet compatible mount like the Rhino mount. The standard PVS-14 J-Arm also utilizes a bayonet interface.

Dovetail connectors are already commonly seen on most dual-tube NVDs, and these are usually built into the device. If you’re using a dual tube NVD, this is the method you’re going to use to connect the NVD to the mount which will connect to the helmet. PVS-14s can used with dovetails if you have something like a Norotos dual dovetail adapter or Wilcox PVS-14 J-Arm. PVS-7As and PVS-7Cs use this type of attachment.

Shrouds-
Shrouds mount to your helmet or other head wearable platform. There a few types of shrouds to consider. The main option and the route I suggest you take which is the de-facto standard right now. While I couldn’t find the specific name for it we’ll just call it the MILSPEC interface. I believe ANVIS mounts interface with this shroud, but I am not 100% certain. There is probably some adapter for ANVIS to work with MILSPEC brackets and shrouds, but I am not well versed on ANVIS. Another option is a Norotos proprietary plate option called TATM which isn’t really in wide use outside of USSOCOM. It is even fading from use within USSOCOM.

All of these work, and there are pros and cons to each but the reason why I suggest the MILSPEC route is because there are more shrouds available. If you are using a standard Rhino mount, this is what it interfaces with. Even Norotos is now producing shrouds with a “universal” interface that accommodates both the MILSPEC and Norotos proprietary mounts.
IR Illuminators and pointers- I’ll cover this in a different post, but you’ll need this if you are using a head mounted NVD and plan of using a rifle.
So you are considering buying night vision, your department is considering purchasing NV, or you are about to get issued NV…
Here’s some basics:
There are two types of ways to use NV: head mounted and weapon mounted.
- Head mounted- this allows you to navigate (mounted or dismounted) at night without using white might. If you want to be able to use a weapon with head mounted NVGs, you’ll need an Infrared (IR) laser (also known as a pointer) and possibly IR illuminator
- Weapon mounted- obviously this allows you to use your NV to shoot. There are two options for weapon mounted NV:
- Clip-on (in front of your normal optic)
- This allows you to use your day optic
- You will not be able to use this device for navigation, it is a dedicated device specifically for your weapon
- PVS-14 weapon mount kit (behind your optic)
- You’ll need a NVG compatible optic like the Aimpoint P.R.O.
- While this gives you an ability to remove the NVD and move it to a head-mounted system for navigation, there is obviously a transition time to do this.
- Clip-on (in front of your normal optic)
I would recommend a head mounted NVD with an IR pointer/illuminator as the best COA. This allows you to navigate and use your weapon effectively without having to move your device. If you can afford it, have a NV clip on and a head-mounted NVD.
Single Tube units: PVS-7, PVS-14, Mum-14
Although it covers both eyes, a PVS-7 is a single tube unit. The image from the “tube” is split over both eyes, giving you the same night vision angle of view as you would have with a PVS-14. Because the PVS-7 covers both eyes, if your device were to cut off for any reason (dead batteries, other device failure, or a built in safety trips when your tube receives a high amount of visible light from a flash light, flash bang grenade, headlights, or whatever…). You can navigate with both eyes covered, but it is different than just navigating with one eye covered. Personally, I would never pair up two PVS-7 users as drivers/vehicle commanders or assistant drivers in the same vehicle. Also, the PVS-7 isn’t practical for any behind the optic weapon mounting set-up
A PVS-14 is a single tube unit that only covers one eye. You want this to cover your non-dominant eye. The advantages this has is you get the same field of view from your NVD as you do with a PVS-7, but you still get to see natural out of one eye. If your device were to cut off you would not be in essence blindfolded by having both your eyes covered with a non-functioning NVD. Going back to the driving under NVDs situation, if the driver had a PVS-7 and it were to shut off, the TC or AD would still be able to take the wheel and steer the vehicle safely while the driver addressed the issue with his NVD.
A MUM-14 is basically a smaller PVS-14. It is not as rugged as a PVS-14 but it weighs less.
Dual Tube units: PVS-15, PVS-23**, PVS-31, DTNVG, Sentinels, Mod-3, RNVG, Bridged PVS-14s, and many more.
If you’re lucky enough to have these issued, fantastic. If you are planning on purchasing a dual tube unit, well congrats about being frugal enough to save for them, you get that bonus from work, sorry about your relative dying but leaving you an inheritance, or whatever financial windfall you have. These are more expensive than single-tube units. Dual tube units are about twice as expensive as single tube units- all things being equal in tube quality. The big thing to keep in mind with these units (aside from tube quality which I’ll discuss later) is that they essentially do the same thing, just the different variations offer different features. Most of these terms are not unique to dual tube units, so if you know you won’t be issued a dual tube unit or can’t afford it, still pay attention to this, and this is a good time to cover some basic technical terminology:
- Gain- This how the device adjusts or is adjusted for the amount of visible light or IR illumination is in the environment.
- Autogain- with an Autogain unit, the NVD automatically adjusts the brightness output towards the user’s eye. Autogain sounds cool of you know nothing about NVGs, but from personal experience I can say I’ll never use an autogain NVD if I have a choice. The Autogain is not effective if there is a lot of visible light in your field of view, I’m specifically referring to streetlights about this. Driving from a dark area into a town or village that is illumined under NVGs is a pain in the ass. The unit is lowering the brightness because it receives the bright ambient light, but the road or trail you’re on isn’t illuminated, so it is very dark in the place you immediately care about (the road or path you’re traveling) and the bright area that you don’t really care about because you’re not there yet is adjusted to an appropriate level.
- Manual gain- Basically none of the issues I mentioned above with Autogain. With manual gain you can adjust your device to find that sweet spot between illuminating the path of your travel and not making it pick up too much light to wash out the area immediately in front of you. Dual tube units vary between a single gain to adjust both tubes and dual gain to individually adjust each tube. The dual gain adjustment provides the best refinement, in my opinion.
- Autogated- This means the intensifier rapidly turns itself off then back off (the user doesn’t even notice it) to increase battery life but most importantly it acts as the safety to keep too much light from entering and damaging the tube. Remember that scene from Silence of the Lambs when Buffalo Bill is wearing NVGs then Carice cuts on the lights? If that were reality and not Holywood, it would mean Buffalo Bill didn’t have an Autogated device. A non-Autogated device is okay if you’re going to be using your NVGs to look at stars or hunt coyotes or whatever. But if you are going to be using your NVGs on a two-way range, I’d recommend Autogated systems. What happened to Buffalo Bill? He fucking died, so don’t fucking die.
So back to the variance in the Dual-tube NVG units, some are compatible with external battery packs or power supplies, some have one battery unit for both tubes, and some have a battery unit for each tube. If I had to rank them in my preference: I’d go with 1. External Battery Pack, 2. Integrated on board battery unit, 3. Separate battery units per tube. That being said, there are still situations where I would choose an integrated battery unit over an external battery unit. The housing is different in these different dual tube devices. Different types of polymers or metals are used depending on the device. If you are buying a dual tube unit, you are going to be dropping a substantial amount of money, so do your research about each device
Tubes- Okay, here is the heart of the device. I could lose people in the technical detail of this so I am going to be brief about this. The two big things you need to look at when choosing a device are the Generation of the tube or tubes used and see if it is a green tube or a WP tube.
1. Generation of tubes- To be perfectly honest, I would never buy or recommend anyone buy anything less than a Gen 3 device for anything I would use on a two-way range. Gen 2+ tubes are okay, but they require additional IR illumination and if you think the opposing force/target/whatever has NVGs, they’ll see your IR illumination with any Generation of NV, to include the cheap ass Amazon Chinese made night vision. If you just want to shoot steel targets long range at night or shoot coyotes, Gen 2+ is great for that. I plan on purchasing a Gen 2+ clip on eventually, so they do have their uses. Don’t even waste your time and money on Gen 1 or Gen 2 NVDs.
2. Green vs. WP- WP is the new hotness, and with damn good reason. I have substantial time under green tubes and eye fatigue is real. After 4 hours, your eyes start hurting. If you have to lift up your NVD or close your eyes for a 10-15 seconds to give your eyes a break that is time you may miss that target leave the location. If you’re in a potentially lethal environment this might have even more catastrophic effects. Green works, but understand the difference. WP tubes have a light green/blue hue to them opposed to the green on black from traditional green tubes. If you can afford it, buy WP tubes.
There are places that offer Gen 2 WP tubes. At the end of the day, these are still Gen 2 tubes. I’d rather have a Gen 3 green NVD over a Gen 2 or Gen 2+ WP NVD. The trade off in image quality is not worth the reduced eye fatigue.
Now is a good time to talk about helmet and head mounting methods along with the basics of attaching a NVG to your head mounting system.
Helmets: You have ballistic and non-ballistic (or “bump”) helmets. There are different cuts available and I’m not going to cover this in too much detail at this time. That is better for a follow on post. Helmets allow you to mount IFF markers, such as IR flags, IR chemlights, or reflectors, counter-weights if you have a heavy NVD, mounted ear-pro/comms to your helmet, and IR illuminators designed to brighten up your immediate area.
- Ballistic- provides ballistic protection. Make sure any “ballistic” helmet actually has a NIJ rating. Please don’t buy some Chinese shit that isn’t held to the same standards as a NIJ approved piece of equipment to save a few hundred bucks. This is your fucking head we’re talking about, the thing that has your brain in it. If you can’t afford a ballistic helmet from a well-respected manufacturer, buy a bump helmet (or use a head-mount) and same your money for the real thing. Crye, OpsCore/Gentex, Rabintex, 3M/Ceradyne, Mtek, and Revision are all good to go. Some of these companies offer bump helmets too, so make sure you are buying a ballistic helmet if that is what you are needing.
If these are too expensive and you need something on a short enough time line where you can’t save up for or get a purchase request approved for these helmets, surplus ACH’s are a great option.
A real quick thing about counter-weights: if you are using a PVS-14 with a ballistic helmet, you probably don’t need a counterweight. Also, any external battery pack can be used as your counterweight if you are using a dual tube NVD. I use a counter-weight on my bump helmet with a PVS-14, but others do not.
Other head mounting options- There are basically two categories for this: The surplus NVG head mount (AKA “Skull Crusher”) and non-traditional options.
- Surplus Skull Crusher- It works, it is proven, and it is the worst option you have available. It’s nickname exists for a reason, it can be a pain in the ass to adjust, and if you are wearing it you cannot easily wear a helmet properly with it. Avoid this unless there is absolutely no other option. This is the most cost friendly option, but you or your department are already buying this stuff so don’t cut corners.
- Non-traditional COTS options: There are many good options in this area. The Crye Nightcap is what I currently have, but the OpsCore Skull Mount, Raptor Tactical Skull Crusher, and Wilcox L4 Skull Lock seem to be okay as well. I can only comment on the NightCap, and it is great for what it does. Even if you have decided you need ballistic protection, the NightCap is small enough to stuff into a pocket if you need to stash your NVGs if you are doing surveillance on a target and need to look like a normie.
There are three standard interfaces to connect your device to a mount: Bayonet (AKA Horn), Dovetail, and ANVIS**. The PVS-23 is an ANVIS unit and ANVIS units are a little bit unique. I do not know if any ANVIS mounting systems are compatible with the non-traditional COTS head mounts I listed above. While ANVIS mounts have been used by USSOCOM, they are primarily a mounting interface for Aviation guys. Unless you’re already deep into ANVIS mounts and interfaces, I would not go this route. A positive about ANVIS is because they are designed to be Aviation goggles, they have an external battery pack.
The bayonet interface is standard interface. It works but there is going to be wobble with your device on your head. I do not know of any dual tube NVDs that use the bayonet interface, but the PVS-7 does and it is built into the unit, so it’ll be very difficult to change that out. If you’re using a PVS-7B or PVS-7D, you’ll likely need bayonet compatible mount like the Rhino mount. The standard PVS-14 J-Arm also utilizes a bayonet interface.
Dovetail connectors are already commonly seen on most dual-tube NVDs, and these are usually built into the device. If you’re using a dual tube NVD, this is the method you’re going to use to connect the NVD to the mount which will connect to the helmet. PVS-14s can used with dovetails if you have something like a Norotos dual dovetail adapter or Wilcox PVS-14 J-Arm. PVS-7As and PVS-7Cs use this type of attachment.
Shrouds-
Shrouds mount to your helmet or other head wearable platform. There a few types of shrouds to consider. The main option and the route I suggest you take which is the de-facto standard right now. While I couldn’t find the specific name for it we’ll just call it the MILSPEC interface. I believe ANVIS mounts interface with this shroud, but I am not 100% certain. There is probably some adapter for ANVIS to work with MILSPEC brackets and shrouds, but I am not well versed on ANVIS. Another option is a Norotos proprietary plate option called TATM which isn’t really in wide use outside of USSOCOM. It is even fading from use within USSOCOM.
All of these work, and there are pros and cons to each but the reason why I suggest the MILSPEC route is because there are more shrouds available. If you are using a standard Rhino mount, this is what it interfaces with. Even Norotos is now producing shrouds with a “universal” interface that accommodates both the MILSPEC and Norotos proprietary mounts.
IR Illuminators and pointers- I’ll cover this in a different post, but you’ll need this if you are using a head mounted NVD and plan of using a rifle.