AR-15 Zeros and Trajectories
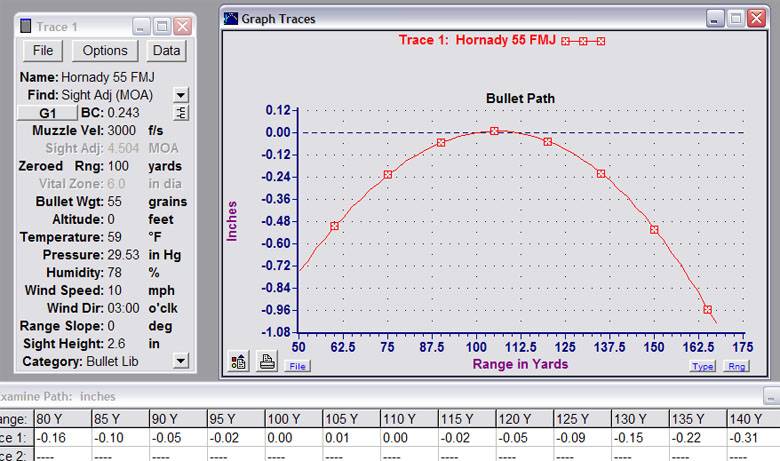
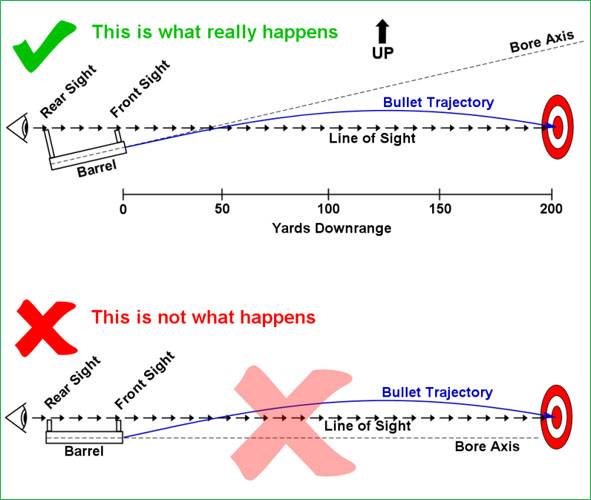
The 100 yard zero with a .223/5.56mm AR-15 carbine is a unique trajectory in that the bullet just “kisses” the line of sight at 100 yards and rides along it for approximately 10 yards before dropping back down below the line of sight. (Technically, the bullet does travel above the line of sight, but by only 0.010”; a fraction of the diameter of the bullet itself.)
For all other zeroing schemes, there are going to be two points were the bullet crosses the line of sight; the near-zero and the far-zero. For the near-zero, the bullet will cross the line of sight while traveling upward from the muzzle toward the apogee or “maximum ordinate,” its highest point of travel. For the far-zero, the bullet will cross the line of sight while traveling downward from the maximum ordinate.
Now, when assigning a name to a particular zeroing scheme, it would be helpful if that name gave descriptive information about that particular zero; that is, the name should give us information about the trajectory and how it is unique and differs from other trajectories.
As a point of reference, the Santose Improved Battlesight Zero is often referred to as a 50/200 yard zero, however this is incorrect. It is actually a 50 yard/200 meter zeroing scheme;
and this is only with a very few particular combinations of bullet weight, barrel length/muzzle velocity and height of sights above the bore. As an example, a 20” barreled AR-15 A2 firing 62 grain M855 will not match the 50 yard/200 meter IBZ. Neither will a 16" barreled RECCE firing 77 grain MK262, nor a 14.5” barreled M4 carbine firing the 70 grain 5.56mm Optimized "Brown Tip" load. The same concept applies when people refer to a 50/225 yard zero. Only a very few specific combinations of bullet weight, barrel length/muzzle velocity and height of sights above the bore will match that description.
What this is all leading up to is this;
except for a very few specific combinations of bullet weight, barrel length/muzzle velocity and height of sights above the bore, a 50 yard zero is a different zero than a 200 yard zero. For a 200 yard zero, we know that this trajectory will produce a far-zero in which the bullet will cross the line of sight at 200 yards in its downward travel from the maximum ordinate. (It is physically impossible to produce a 200 yard near-zero with any of the commonly available loads and barrels lengths used in .223/5.56mm AR-15s.) Other than for a very few specific combinations of bullet weight, barrel length/muzzle velocity and height of sights above the bore, the near-zero of the 200 yard zero will not be at 50 yards.
Conversely, a 50 yard zero tells us that this trajectory will have a near-zero in which the bullet crosses the line of sight at a distance of 50 yards in its upward travel to the maximum ordinate. For those who think that a zeroing scheme must be named after its far-zero, it is physically impossible to produce a far-zero of 50 yards with any of the commonly used loads and barrel lengths in .223/5.56mm AR-15s. The 50 yard zero can only be the near-zero.
Here are a couple of illustrations to aid in understanding some of the concepts described above. Lets start with the 100 yard zero as a reference point. As described above, with a 100 yard zero, the bullet’s trajectory just “kisses” the line of sight at 100 yards. Now, let’s increase the elevation setting of the sights/scope. As this is done, the near-zero can only move closer and closer to the muzzle. Concomitantly, the far-zero moves farther and farther away from the muzzle.
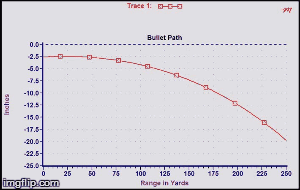
For the next illustration, we’ll start with the 100 yard zero again, only this time let’s decrease the elevation setting of the sights/scope. As this is done, the bullet’s trajectory can only fall away from the line of sight. The bullet will never cross the line of sight again; no zero at all.
Other than for a very few specific combinations of bullet weight, barrel length/muzzle velocity and height of sights above the bore, the far-zero of the 50 yard zero will not be at 200 yards; and for all practical purposes it matters not one bit. Whether the bullet crosses the line of sight for the second time (far-zero) at 189 yards, 200 yards, 215 yards or 225 yards will not make the slightest bit of difference in the practical application of the AR-15 as a defensive weapon. In each case we will be holding the same POA (beyond CQB distances) and know that we will be hitting within approximately 2 inches above or below that POA out to 200 yards (or farther depending upon barrel length and load.) You should have an idea what your actual far-zero is when using a 50 yard zero and confirm such at distance when possible, but again it’s most likely not going to be a 200 yard far-zero and again it does not need to be.
Choose your zeroing scheme based on the pertinent facts; not nonsense about “shooting through a cone.” When shooting at human targets, in the grand scheme of things there isn’t going to be any practical difference between a point of impact that has a negative deviation from the point of aim, (e.g. the bullet strikes 1.5” below the point of aim) and a point of impact that has an equal positive deviation from the point of aim (e.g. the bullet strikes 1.5” above the point of aim.) In other words, the
absolute value of the point of impact from the point of aim (how far the point of impact deviates from the point of aim, regardless of whether it is a positive or negative deviation) is what we need to be concerned about. Therefore, one of the main points to consider when choosing a battle-sight-zero is this: What zeroing scheme produces the smallest absolute values for the deviations of the points of impact from the point of aim, over the distance that we reasonably expect to engage a human target in our intended usage?
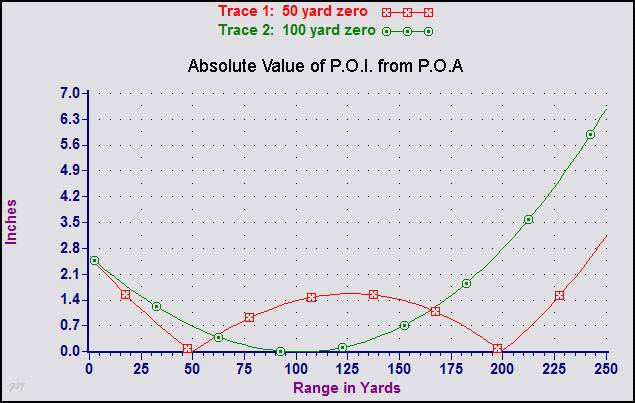
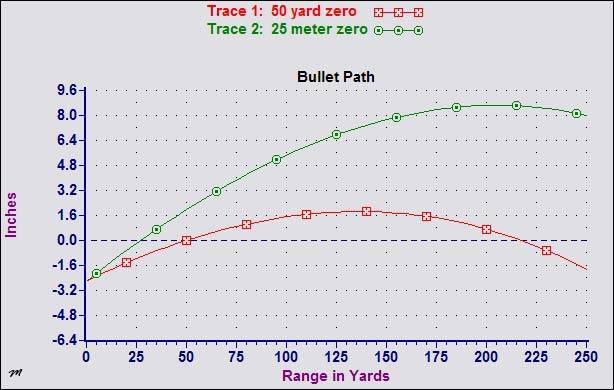
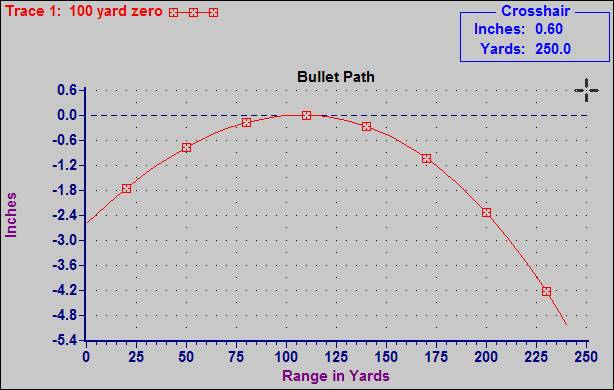
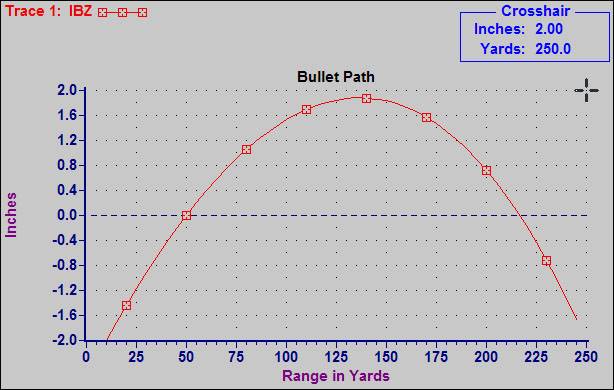
The chart below illustrates the above concept. The chart compares the absolute values of the deviations of the points of impact from the point of aim (0.0 inches on the graph being the point of aim/line of sight) for a 50-yard-zero and a 100-yard-zero, using Hornady 5.56 TAP T2 ammunition.
As you can see in the graph above, from the muzzle (0 yards) to approximately 62 yards, the 50-yard-zero has a slight advantage over the 100-yard-zero. Between the distances of 62 yards and 165 yards, the 100-yard-zero has the advantage. From the distance of 165 yards out to the 250 yards shown in the graph, the 50-yard-zero has a distinct advantage over the 100-yard-zero. Choose your zeroing scheme based on the pertinent facts.
Some reference material. Except where noted, all barrel lengths are 20 inches
Courtesy of zrxc77
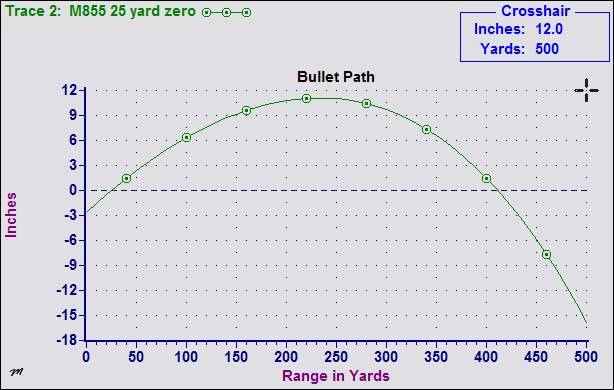
M855 25 yard zero
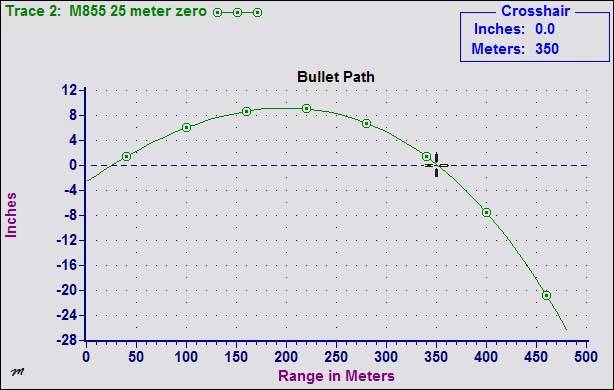
M855 25 meter zero
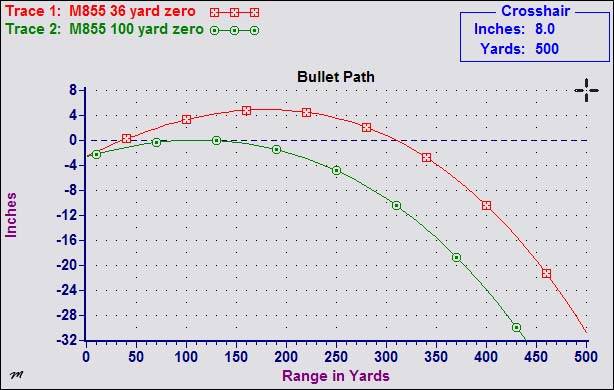
M855 36 yard vs 100 yard zero
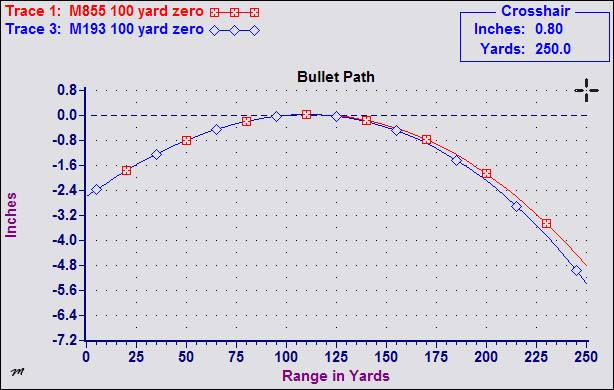
M855
M855 and M193 25 meter zero
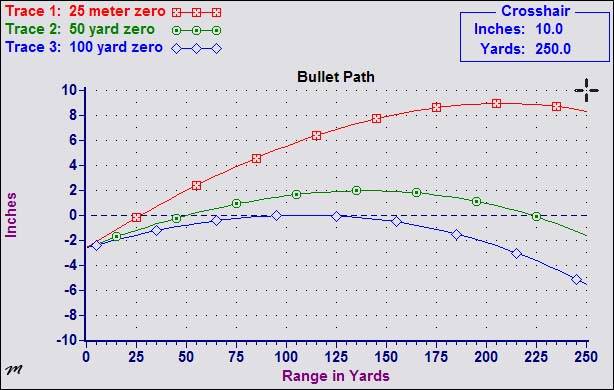
M855 and M193 50 yard zero from 16” barrel
M193 25 meter, 50 yard and 100 yard zeros from 16" barrel
100 yard zero
25 meter vs 50 yard zero, M855 from 16” barrel
25 meter vs 50 meter zero , M193 from 16" barrel
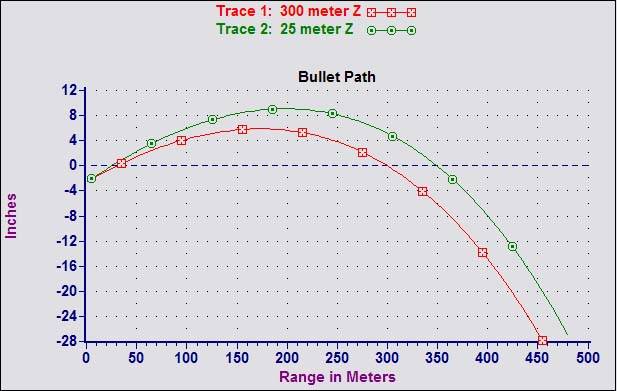
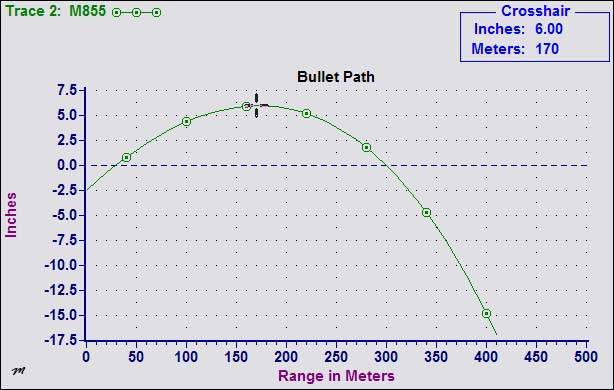
M855 300 meter zero
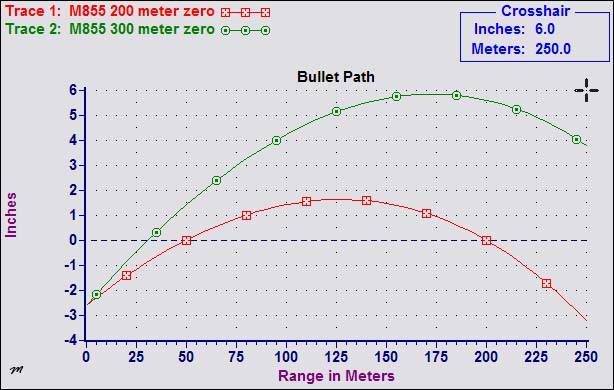
M855 200 meter vs 300 meter zeros
M855 36 yard vs 50 yard zeros
RIBZ
Revised Improved Battlesight Zero
The standard A2 rear sights on an AR-15/M16A2 were designed with elevation settings for 300 to 800 meters. The Santose Improved Battlesight Zero allows for an elevation setting of 50 yards/200 meters for one of the most all-around useful trajectories obtainable with the 5.56mm/223 Remington cartridge when fired from an AR-15.
Neither of the above sighting schemes allow for an elevation setting giving you point of aim equals point of impact at 100 yards. Since 100 yard shooting ranges are some of the most commonly found ranges in the United States and some agencies are promoting the use of a 100 yard zero, it would be useful to have such a setting on our AR-15s. This can be achieved quite easily with nothing more than a 1/16” allen wrench. It’s really just a matter of taking the Improved Battlesight Zero one step further.
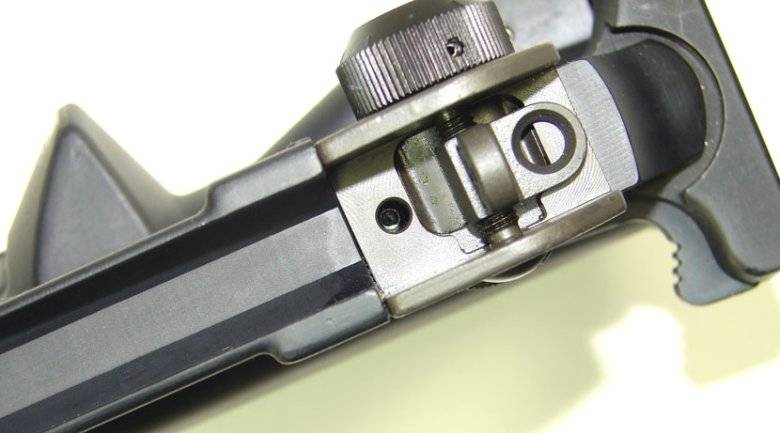
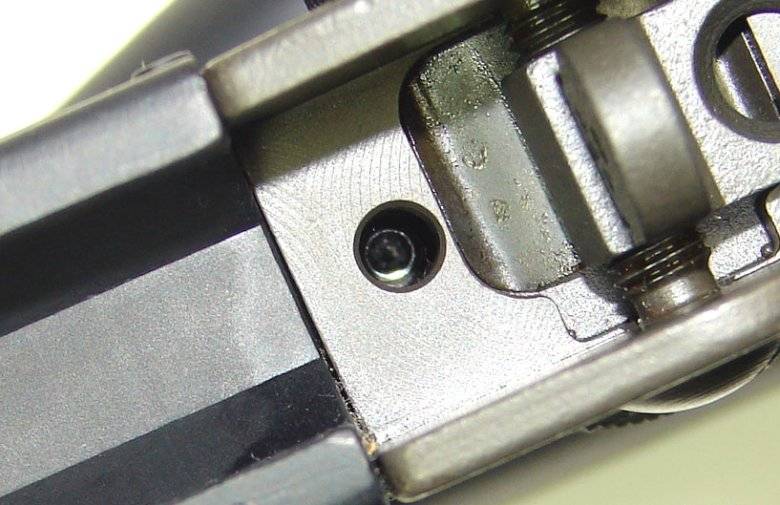
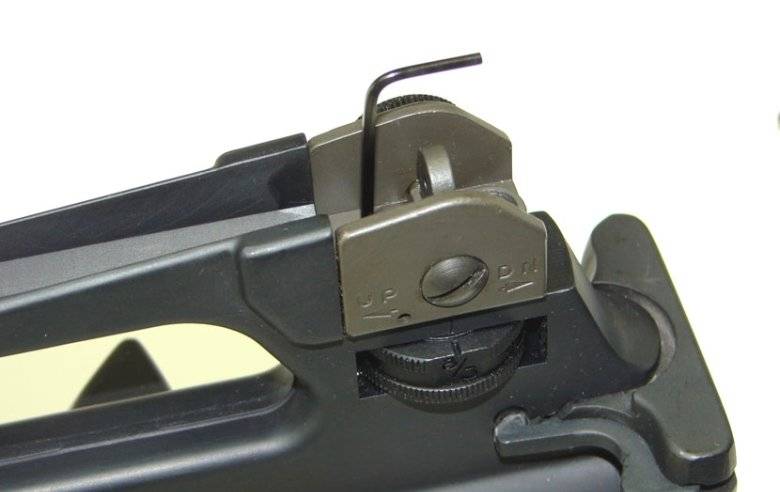
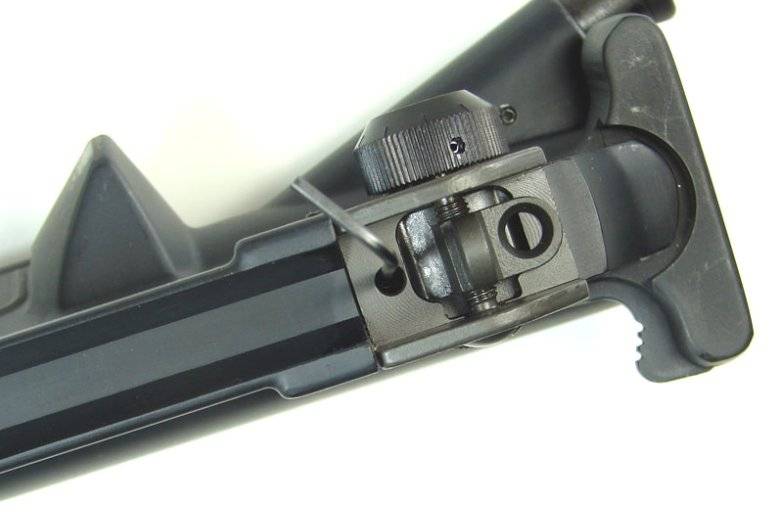
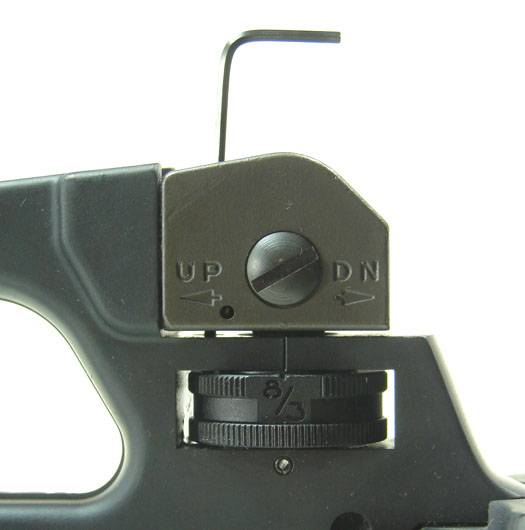
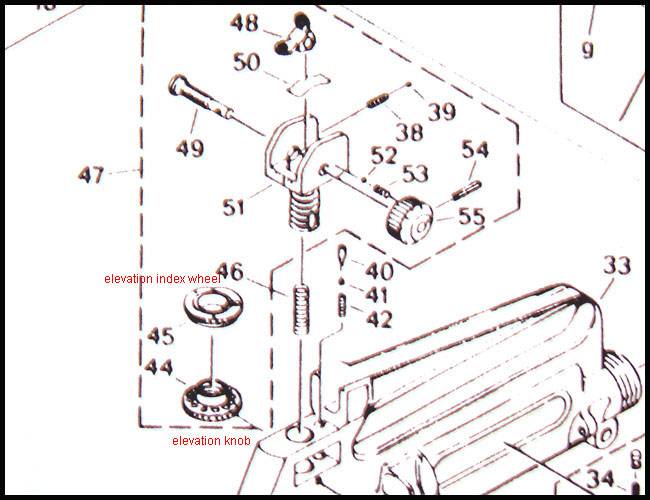
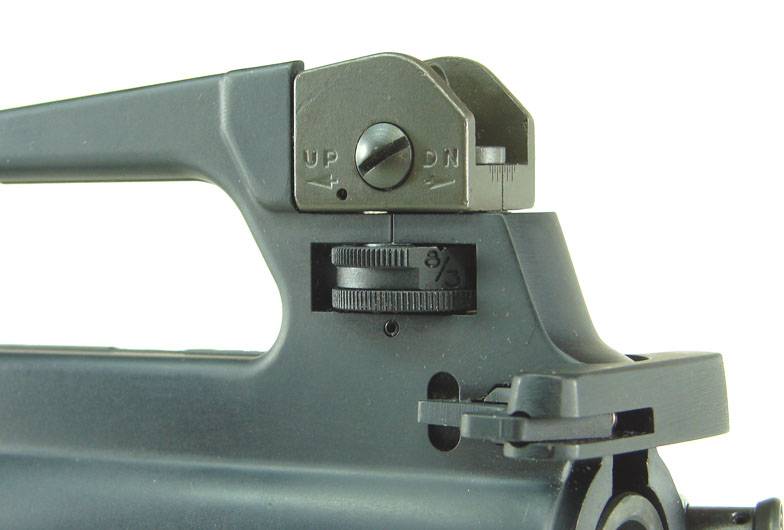
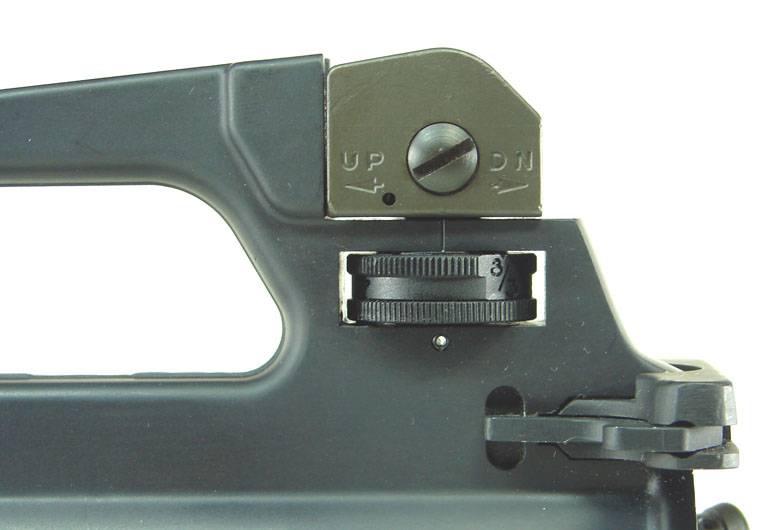
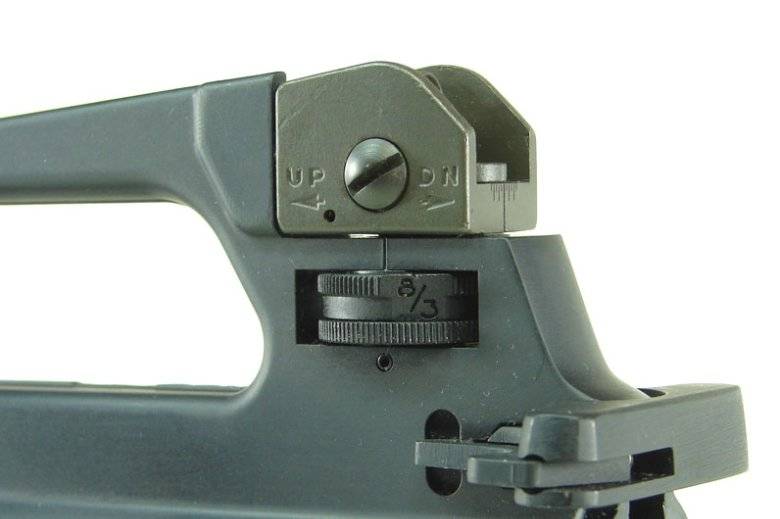
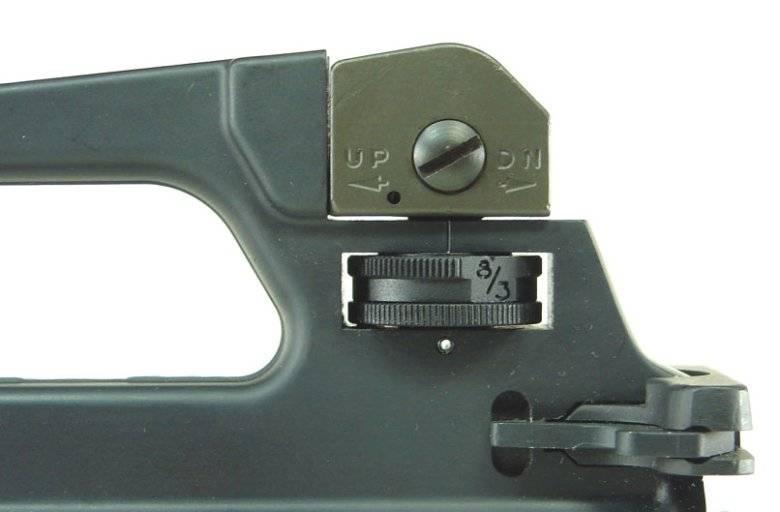
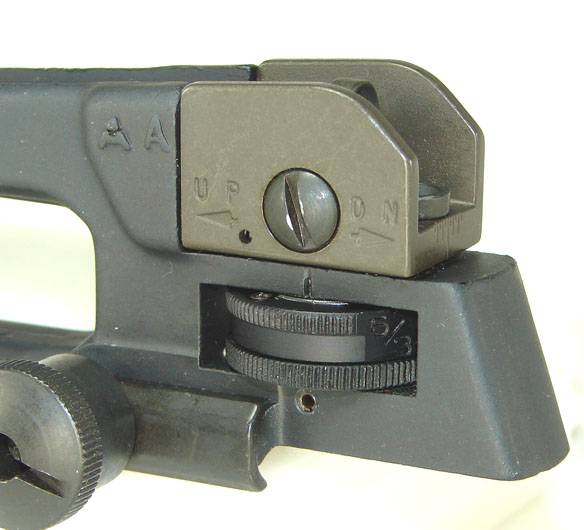
There is a witness hole on the A2 rear sight base that gives you access to the index screw that you will need to loosen with the 1/16” allen wrench to make the necessary alteration to the elevation drum. The witness hole lines up with the index screw only when the elevation drum is set to 8/3. Set your elevation drum on the 8/3 setting and turn the screw counter-clockwise 3 to 4 complete turns. You don’t want to remove the screw. You want to loosen it enough to allow the elevation index wheel (the top part of the elevation drum with the numbers on it) and the elevation knob (the bottom part of the elevation drum) to separate and be able to move independently of each other.


Once you have loosened the index screw, use one hand to hold the allen wrench in place on the screw and with your other hand turn the elevation knob (the bottom part of the elevation drum) 4 clicks clockwise.* You should see the rear sight base moving up while you do this. The elevation index wheel should not move while you are doing this. (We really only need to turn the elevation knob 3 clicks clockwise, but by turning it 4 clicks we get a “buffer zone” that keeps the rear sight base from coming into contact with the lower receiver when the sight is moved to the lowest used setting. This gives you a more consistently repeatable sight setting.)

Now that you have moved the elevation knob 4 clicks clockwise, taking care to make sure the elevation index wheel has not moved, firmly tighten the index screw. Starting with the elevation drum at the 8/3 setting, you should easily be able to turn the drum counter-clockwise 3 clicks and see the rear sight base moving down. (You should be able to turn the elevation drum one more click counter-clockwise for our “buffer zone.”) You are now ready to head to the shooting range.
As I mentioned earlier, this sighting scheme is really just taking the Improved Battlesight Zero one step further. Starting with the elevation drum at the 8/3 setting, turn the elevation drum counter-clockwise 3 clicks (8/3, -3). This is your 100 yard point of aim equals point of impact setting. From a distance of 100 yards, zero the rifle with the rear sight at this setting (using the small sight aperture). Do not change this rear sight elevation setting while zeroing. Use the front sight post only to make changes in elevation while zeroing.
The beauty of the RIBZ sighting scheme is that once you have zeroed the rifle with this method, you will have your 100 yard zero setting and the other settings of the elevation drum remain intact (within the limits of the coarse adjustments of the A2 sights). If you want to use the Improved Battlesight Zero, simply set the elevation drum to 8/3, -2 and you're good to go. To use the standard military 300 meter setting, just set the elevation drum to 8/3. You can also start the zeroing process by obtaining the Santose Improved Battlesight Zero at a distance of 50 yards with the rear sight on the 8/3, -2 setting. Obviously, slight variations will be encountered depending on the ammunition used and the actual amount of movement with each click of the various sights. The results will certainly be close enough “for government work.”
When using this sighting method, you may find that once you have set your 100 yard zero, the top of the base of the front sight post is now slightly above the top of the well in the front sight base. If this happens, the “0.040” taller” front sight post from Bushmaster provides a quick and inexpensive fix.
100 yard zero (8/3, -3)
Improved Battlesight Zero (8/3, -2)
Standard 300 meter zero (8/3)
* E.T.A.
All click references should be doubled when using detachable carry handle sights.
IBZ (6/3, -4)
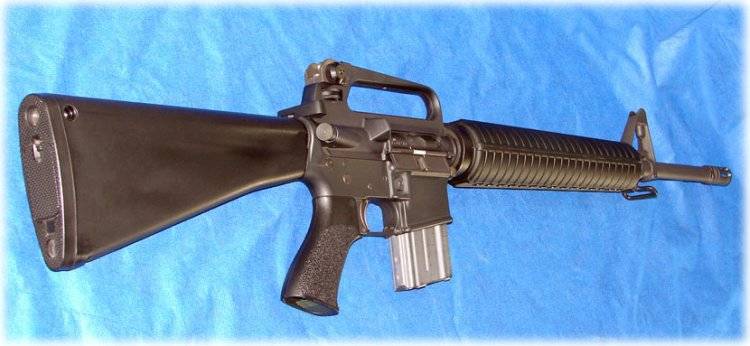
While the Revised Improved Battlesight Zero is certainly not perfect, here is an example of how well it does work at the distances typically encountered at the public KD ranges in my state. I zeroed my 20” Colt with A2 sights at 100 yards as described in this thread. Here is a pic of a 10-shot group from 100 yards.
100 yards, (8/3, -3)
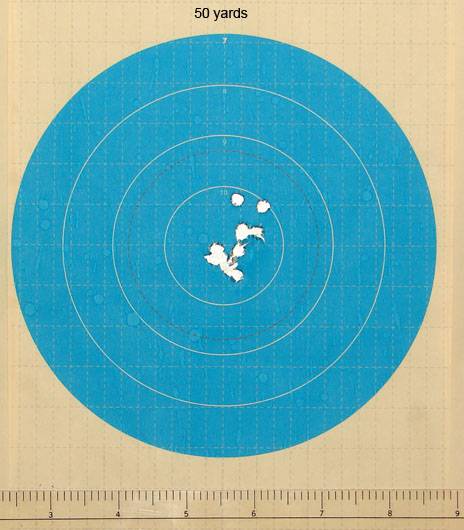
Next, I packed up my gear and headed to the 50 yard line. By simply coming up one click on the elevation wheel (8/3, -2), I was in the 10-ring at 50 yards.
50 yards, (8/3, -2)
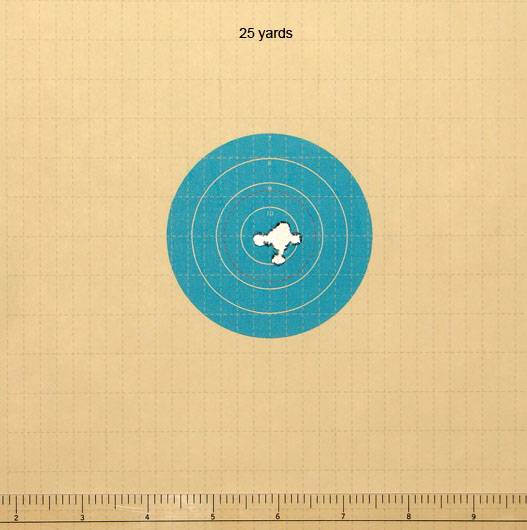
Lastly, I moved down to the 25 yard line. With this sighting scheme, setting the elevation wheel to (8/3, +3) gives me the necessary elevation for 25 yards. (Again, due to the course adjustment of the AR-15 sights and manufacturing tolerances none of these settings are perfect.) In fact, if you don't have access to a 100 yard range or you just want to “get on paper” before heading to the 100 yard range to refine the zero, you can zero at 25 yards using this setting.
25 yards, (8/3, +3)
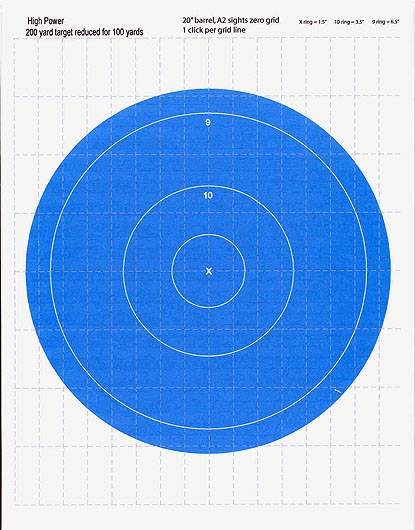
Here is a down-loadable target in .pdf format that can be used for zeroing 20” uppers with A2 sights at 100 yards using the Revised Improved Battlesight Zero. The dashed vertical grey lines represent one click of the windage knob. The dashed horizontal lines represent one click of the FRONT SIGHT POST.
100 yard zeroing target
When printing, you need to have the “page scaling” option in Adobe Reader set to “none” in order for the target to print with the correct dimensions.
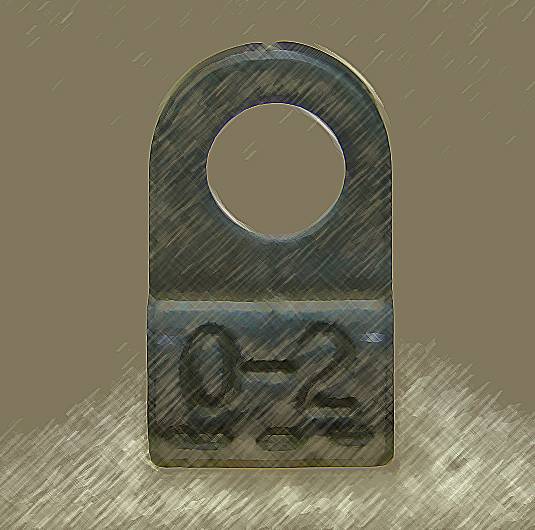
0-2
There seems to be some confusion around here as to the function of the “0-2” large aperture of the A2 rear sight. The field manual for
M16A1 and M16A2 Rifle Marksmanship states, “The larger aperture, marked 0-2, is used for moving target engagement and during limited visibility. The unmarked aperture is used for normal firing situations, zeroing and with the elevation knob for target distances up to 800 meters. The unmarked aperture is used to establish the battlesight zero.” That’s pretty straightforward.
Using a digital caliper, the diameter of the small aperture of the A2 rear sight measures approximately .070”. The large (0-2) aperture has a diameter of approximately .200”. No confusion there.
To use the 0-2 large aperture, simply push forward and down on the small aperture portion of the sight leaf to snap the large, 0-2 aperture up into place. That couldn’t get much easier.
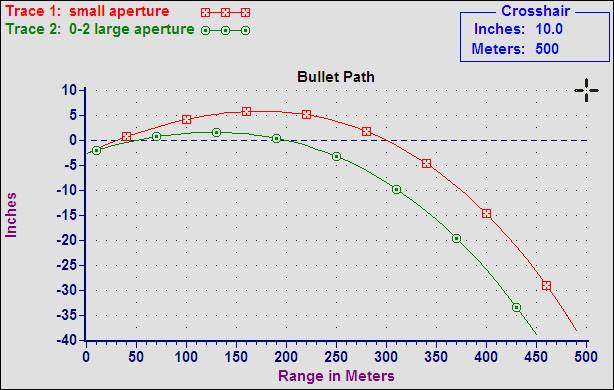
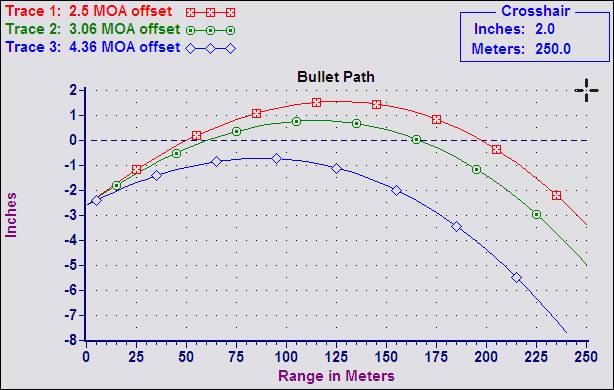
The confusion surrounding the use of the 0-2 large aperture seems to stem from a misunderstanding of the amount of elevation change involved when changing from the small aperture to the large aperture. The small aperture is intended to be zeroed for a 300 meter zero using M855 fired from a 20” barreled M16A2. The 0-2 large aperture is intended to provide a 200 meter zero, when the small aperture has been properly zeroed with M855 from a 20” barreled M16A2. If you examine the trajectories of M855 fired from a 20” barreled M16A2 zeroed at 300 meters, and at 200 meters, you will see that the difference in elevation between these two trajectories (and hence the difference in elevation between the small and large apertures) is 2.5 MOA.

To demonstrate this concept, I fired two 10-shot groups from a 20" Colt AR-15, using the standard A2 iron sights, from the bench at a distance of 50 yards using the small aperture. I then flipped the rear sight to the 0-2 large aperture and fired another two 10-shot groups (all groups were fired on separate targets.) The two sets of groups were overlayed on each other to form 20-shot composite groups using RSI Shooting Lab and analyzed to determine the statistical center of their points of impact.
In a perfect world, the groups fired using the 0-2 large aperture would have the center of their points of impact 2.5 MOA (1.25” at 50 yards) below the center of the the points of impact of the groups fired using the small aperture. The 20-shot composite group formed from the 2 groups fired using the 0-2 large aperture had a center of point of impact 1.01” below the center of point of impact of the 20-shot composite group fired using the small aperture. 1.01” at 50 yards is 2.02 MOA; not exactly 2.5 MOA, but within a half minute of angle and well within my margin of error using the A2 iron sights. As a side note, the groups fired using the 0-2 large aperture were 144% larger than the groups fired using the small aperture.
The shifts will definitely be greater with carbines due to the shorter sight radius. I’d like to thank
Hallorann for sending me a link to the XS Sights (formerly Ashley Express) website where there is some information that may shed some more light on this subject. I have not experienced this myself and therefore cannot vouch for the validity of the information, but according to XS Sights there are three different A2 rear sight leafs on the market that have different elevation offsets; however, XS Sights does not state which manufacturers/models use which rear sight leafs. (My experience with the A2 sights has been strictly with Colt 20" models and they have all had the 2.5 MOA offset for the 0-2 large aperture, and yes, I drank the Kool-Aid.)
According to XS Sights:
“Comparing some of the rear sights available today there appears to be 3 variations available. The 1st style (and oldest) has a .014 offset. This gives a 2.52 inch shift in point of impact at 100 yards between the two apertures. The 2nd style has a .017 offset, which shifts point of impact 3.06 inches at 100 yards. The 3rd style has a .024 offset giving a 4.36 inch shift in P.O.I.
All of the points of impact shifts shown above are for the standard barrel AR-15/M-16 that has a sight radius of 20 inches. The shorter sight radius (14.5 inches) of the M4 carbine and weapons of similar configuration increase the amount of point of impact shift. The shifts for these shorter sight radius weapons are 3.48, 4.25, 5.96 inches respectively.
The only reason for the various shifts would be for changes in the ammunition used by the military over the course of this weapons employment.”
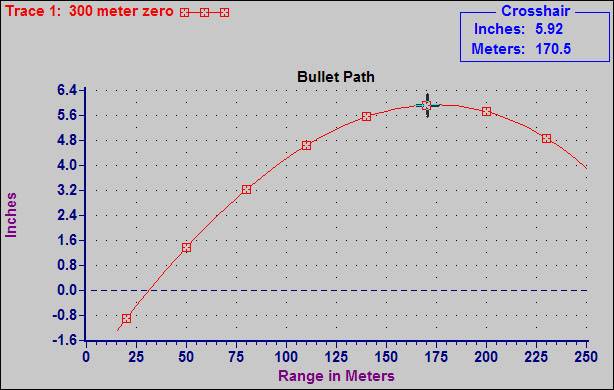
The last statement in the above quote seems rather odd to me, as M855 still is, and always has been the standard issue ammunition since the adoption of the M16A2. Also, I don't see any particular use for the 3.06 MOA and 4.36 MOA offsets for a 20" barrel. With the small aperture properly zeroed for 300 meters, the 3.06 MOA offsett will produce a 165 yard zero and with the 4.36 MOA offset, the bullet will never cross the line of sight.
20" barrel with M855 zeroed for 300 meters
Colt Front Sight Post Primer
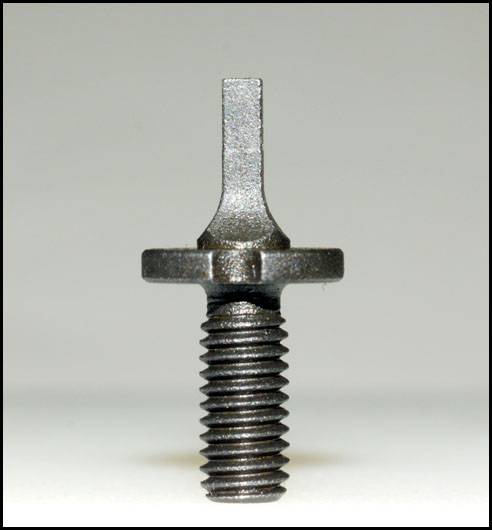
Colt currently offers four different front sight posts for use on their AR-15/M16 family of weapons. The front sight posts can be categorized according to their basic shape, (square or round) their profile, (straight or tapered) and their height, (short or tall.) The height of the posts are measured from the top of the sight post down to the top of the “flange” of the sight post.
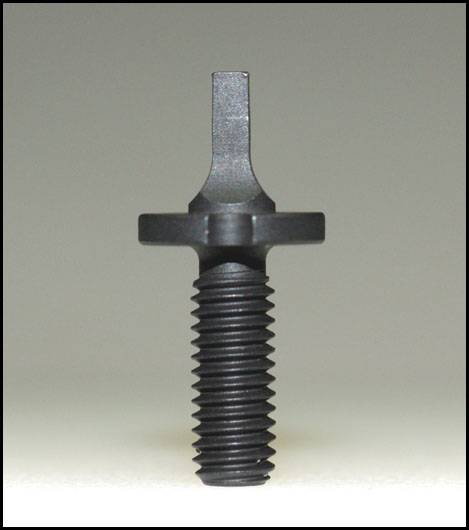
The sight post with the part number SP64507 has a short, square and straight configuration. This post has a nominal height of 0.270”
SP64507
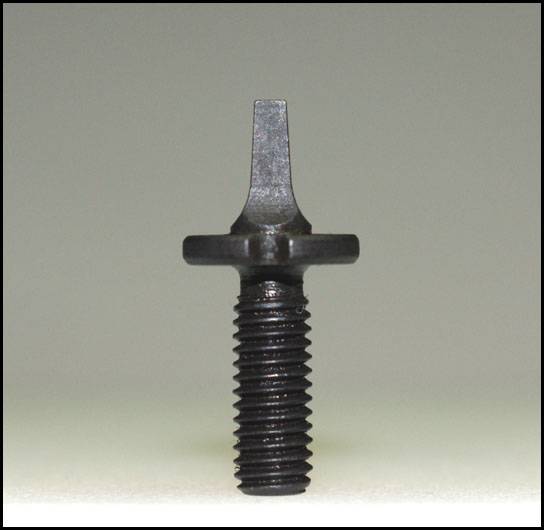
Part number SP64665 also has a short and square post, but differs from the above sight post in that it has a tapered shape to it; broader at the base and narrowing at the top. The height of this post is also 0.270”.
SP64665
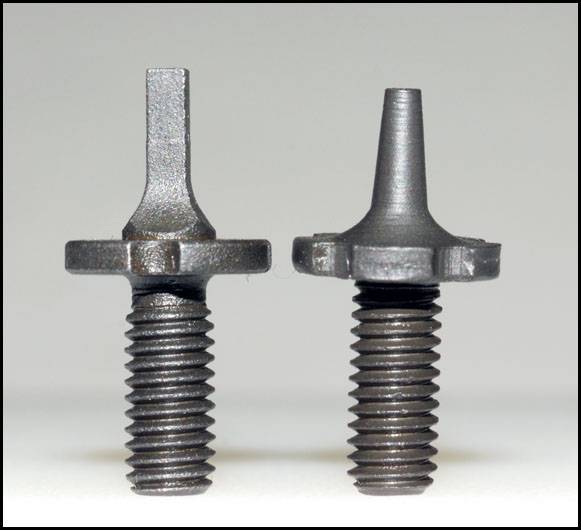
Shown below are the square, short/straight and short/tapered sight posts side by side for comparison.
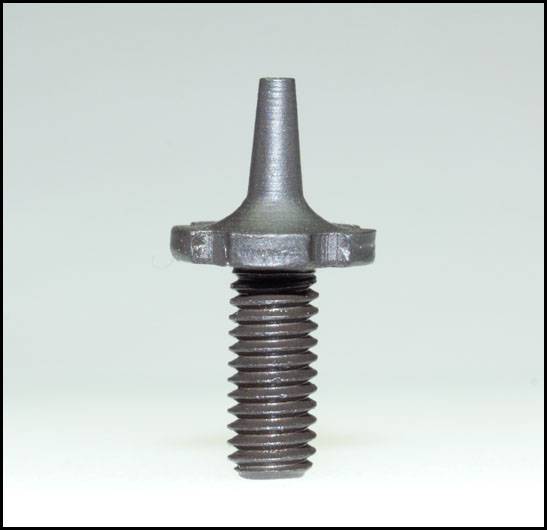
The sight post associated with the M16/M16A1 series of rifles has a round shape and is also short and tapered. The part number for this post is SP61706. It is slightly shorter than the two posts described above with a height of 0.260”.
SP61706
The last sight post is Colt’s tall sight post which has a nominal height of 0.300”. It has a square and straight configuration. Its part number is SP62447.
SP62447
Here is a pic with the round sight post and the tall sight post side by side for comparison.
The original round sight post has five equally spaced notches around the sight post flange for elevation adjustment. Each notch corresponds to 1 MOA of elevation (when used with a rifle length sight radius). The other three sight posts all have four elevation notches on their flanges corresponding to 1.25 MOA of evlevation.
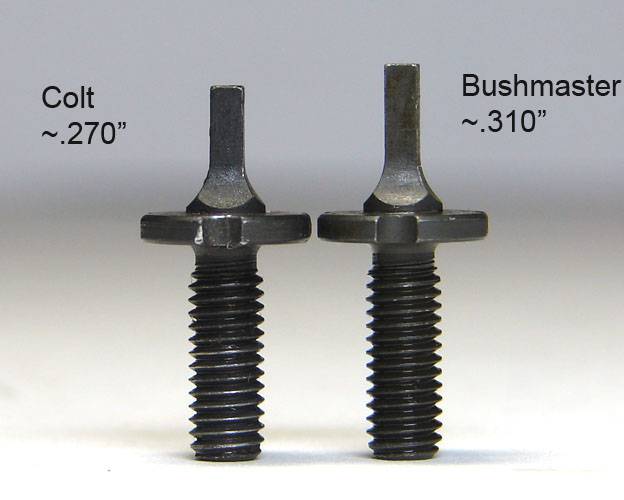
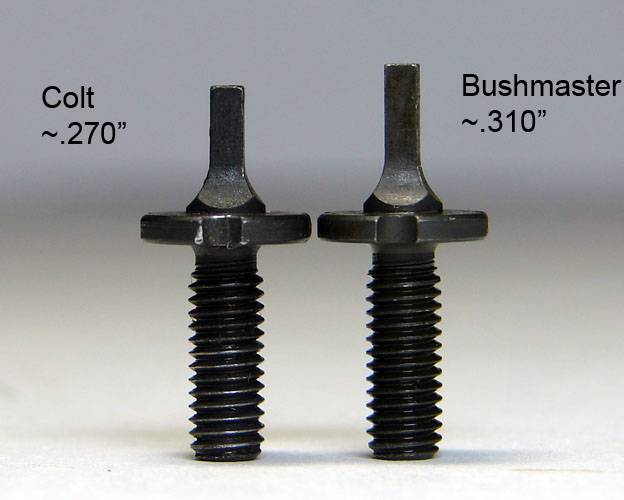
Bushmaster makes a front sight post that has a nominal height of 0.310”.
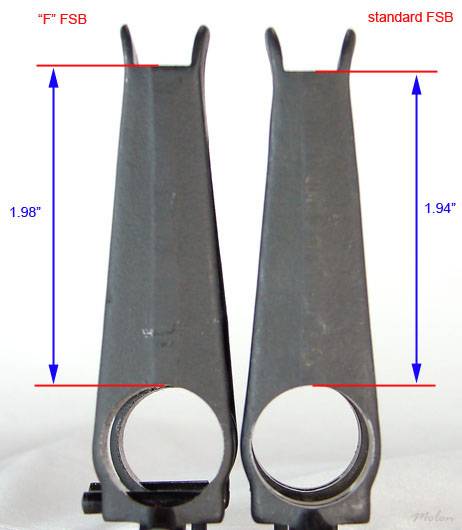
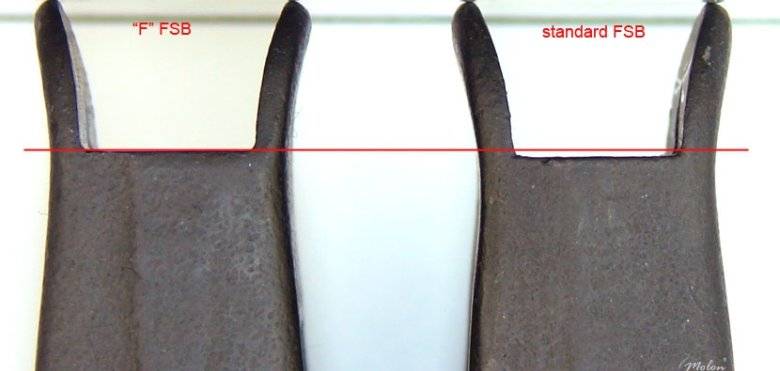
"F" Marked Front Sight Base
There is no difference in the overall height of an “F” marked front sight base and a standard front sight base. The only difference between the two front sight bases is the height of the sight “shelf” above the top of the barrel.
The front sight post on a standard Colt front sight base will bottom-out in the sight well at approximately 24 clicks below flush. On an “F” marked front sight base the sight “shelf” is a whopping 0.040” higher than on a standard front sight base. That means you might have to turn your front sight post down approximately 6 clicks further with an “F” marked front sight base than on a standard front sight base. (6 whole clicks difference. Oh, the inhumanity!) So unless your front sight post is set at 18 clicks below flush with a standard front sight base, using an “F” marked front sight base on a 20" barrel will be a non-issue.
.....