


thuong2lan
Newbie
NIGHT VISION INTRODUCTION LEVEL 1: Kinetic Consulting. February 4-5, 2002
Abbreviations: JD-Jon Dufresne (instructor), KC (kinetic consulting), NV (night vision), NOD (Night Optical/Observation Device), NVG (Night Vision Goggles)
Day one: 1645-0100
Day two: 1700-0100
Instructor profile: Instructor Cheat Codes 7 - Jon Dufresne - YouTube
Intro: I could not find any AARs for this class online and wrote this review to help future students. I am a civilian with no prior LE or Military experience and a complete novice in regards to NV. I also realize the unlikelihood of having to use my NVD operationally for home defense or otherwise (I don’t hunt). However, I have the toys so I need to know how to play with them. I have no conflicts of interest with the training company, its instructor, or any products I may recommend. My skill level is high intermediate for pistol and low intermediate for rifle. I will not be detailing all the drills out of respect to the instructor but will comment on their utility/application. The class was on a Friday and Saturday night, which I think is ideal for a two-day night vision class. It gives you time on Sunday to wind down, clean your gear and prepare for the work week.
Class Demographics: 10 students total (originally 17 signed up but seven withdrew for various reasons) and all were Texans. Four of the students were veterans: Two army, one USMC, one Air Force. Occupations were diverse including: Software consultant, machine operators, engineers, researcher, mechanic, mortgage broker, heavy equipment operator, physician. Some did hog hunting with NVD and the experience level was novice-intermediate. One student had bionic legs but completed the whole class on his Segway wheelchair, which was amazing to observe. Everyone was friendly, helpful, and squared away. No one was unsafe in their gun handling. I think 10 students is ideal for this type of class, especially with no assistant instructor.
Equipment: NODs among the group included DTNVG, DTNVS, PVS14, Bridge PVS14, RNVG. Weapon lasers included MAWLS C1+, DBAL D2, NGAL, PEQ15, and some Russian laser. Most rifles were AR pattern. One was a Galil in 5.45. Most shot suppressed. Round count was about 640 rifle (Wolf steel case 223) and 200 rds pistol (Tula 9 mm 115 gr).
RANGE: The Ranch, Eagle Lake Texas - an incredible 300 acre private outdoor range
WEATHER: the weather was wickedly cold. Temps were in the low 30’s with high humidity and windchill feeling like the high teens, all bad stuff for Texans. Besides my layered clothing (see below), these additions also helped.

DAY 1: 1645 to 0100
What I appreciated about this class was that there was minimal lecture time and no power points. I had attended an 8-hour NVG intro class at the Shooter Symposium and the instructor gave us a three-hour power point talk on the history, science, technology of NVD. Yes, it is important to know the concepts, but three hours in an 8-hour class is excessive.
JD spent the classroom time going over the equipment we had, troubleshooting some setups, and showing us practical tips such as:
We went out to 200 yards and each one of us shot steel standing unsupported. I had a lot of wobble and had to learn how to fire with an acceptable sight picture rather than a stable one.
We concentrated next on learning our offsets for our optics, our laser, and with the rifle canted (CQB mode). This was done at different yardages. A drill called GROUP THERAPY was particularly valuable in revealing your offset. Another drill had us draw a small square at the bottom of the cardboard/paper target. A small semicircle was drawn around the box and we were to shoot at the square. The goal was to keep the laser within the semicircle while trying to aim for the square, and to try different mechanics (changing length of pull, pulling in harder with support hand, raising firing shoulder up and forward, etc) to see which combination was most stable. Placing the square at the bottom meant that all rounds went into the berm and we could concentrate on just the laser position inside the semicircle rather than trying to see the holes in paper. The laser is more visible and you are able to better assess how different mechanics affect rifle stability.
Day one focused us on knowing our weapon systems (both rifle and pistol): switch-ology of our different lasers/lights, when to use white light, passive aiming, vs IR illumination and laser. Shooting with gloves added an additional challenge to manage our buttons and controls. Methods to control our wobble and be comfortable with an acceptable sight picture while shooting and moving was the focus for the remainder of day one. Practical tips were also given to optimize reloading with NODs. We ended at 0100 with 240 rounds expended.
DAY 2: 1700 to 0100
The Ranch is a private outdoor range that has a lodge on premises. I was fortunate to sleep overnight at the lodge and woke refreshed. I spent the afternoon before class confirming optic zero and practicing the techniques JD taught us. Day two was a few degrees warmer but had more humidity. We began the application portion of our fundamentals from day one. We did numerous drills of moving and shooting, both front/rear and lateral and oblique- using both paper and steel. We practiced transitions between close and distant targets. There are basically three different transitions based on distance. For close transitions (less than a yard apart), moving your arms from A to B is most efficient. For medium transitions (5 yardish), rotating your knees while keeping your torso front facing was best. For longer transitions, rotating your knees AND pivoting on your feet worked well. JD also encouraged us to think of transition skills as not just shooting two targets: A & B, but it could be one target moving from one point A to point B. We would start with one round per target, then escalate to two rounds, then three rounds, four rounds, etc. All drills started with rifle then repeated with pistol.
One issue I had was visual patience; waiting for the dot to settle into an acceptable wobble zone before firing. You cannot miss fast enough is so true.
Towards the end, JD did timed exercises as individual competitions. It was performance shooting under NODs and involved movement (front, back, pivoting, rotating), close target acquisition, knowing your offsets (for the close targets), navigating under NODs, target transitions, and throttle control. The competition was a conglomeration of all the basic skills we learned. I was definitely not the fastest nor the slowest. JD went last and whoever had times better than him earned the Mocha Bear patch. No one got it.
“When you buy “Grip”, you also get trigger and recoil control as part of the purchase.” This resonated with me as too often, we work on each piece individually. A successful grip locks the weapon whether it be in your shoulder (rifle) or hands (pistol) and facilitates both recoil and trigger control. Trigger control is necessary but not sufficient by itself for fast accurate shooting. And of course, you cannot successfully manage recoil unless you have a good grip.
Day two also ended around 0100 with about 400 rifle rounds expended. There was a brief classroom time after class when we all debriefed and received swag.
This class is an excellent start for anyone getting into NV. The key features that made this course outstanding were:
Final note; as fantastic as the class was, nothing compared to the beautiful night sky under NODs. We saw billions of stars blanketing the sky, shooting stars, satellites, and even the faint outlines of the Andromeda galaxy. Every chance I got I would look up, wondrous and awed at how lucky we are to be alive, in this country, with the opportunity to own NVDs, shoot guns, and enjoy the freedom that we all shared that night. Take care gents.
P.S. Thank you to G.W. who also took this class and reviewed my post for factual accuracy.
Abbreviations: JD-Jon Dufresne (instructor), KC (kinetic consulting), NV (night vision), NOD (Night Optical/Observation Device), NVG (Night Vision Goggles)
Day one: 1645-0100
Day two: 1700-0100
Instructor profile: Instructor Cheat Codes 7 - Jon Dufresne - YouTube
Intro: I could not find any AARs for this class online and wrote this review to help future students. I am a civilian with no prior LE or Military experience and a complete novice in regards to NV. I also realize the unlikelihood of having to use my NVD operationally for home defense or otherwise (I don’t hunt). However, I have the toys so I need to know how to play with them. I have no conflicts of interest with the training company, its instructor, or any products I may recommend. My skill level is high intermediate for pistol and low intermediate for rifle. I will not be detailing all the drills out of respect to the instructor but will comment on their utility/application. The class was on a Friday and Saturday night, which I think is ideal for a two-day night vision class. It gives you time on Sunday to wind down, clean your gear and prepare for the work week.
Class Demographics: 10 students total (originally 17 signed up but seven withdrew for various reasons) and all were Texans. Four of the students were veterans: Two army, one USMC, one Air Force. Occupations were diverse including: Software consultant, machine operators, engineers, researcher, mechanic, mortgage broker, heavy equipment operator, physician. Some did hog hunting with NVD and the experience level was novice-intermediate. One student had bionic legs but completed the whole class on his Segway wheelchair, which was amazing to observe. Everyone was friendly, helpful, and squared away. No one was unsafe in their gun handling. I think 10 students is ideal for this type of class, especially with no assistant instructor.
Equipment: NODs among the group included DTNVG, DTNVS, PVS14, Bridge PVS14, RNVG. Weapon lasers included MAWLS C1+, DBAL D2, NGAL, PEQ15, and some Russian laser. Most rifles were AR pattern. One was a Galil in 5.45. Most shot suppressed. Round count was about 640 rifle (Wolf steel case 223) and 200 rds pistol (Tula 9 mm 115 gr).
RANGE: The Ranch, Eagle Lake Texas - an incredible 300 acre private outdoor range
WEATHER: the weather was wickedly cold. Temps were in the low 30’s with high humidity and windchill feeling like the high teens, all bad stuff for Texans. Besides my layered clothing (see below), these additions also helped.
- HotHands warmers: Three types. 1) Hand warmers- two in each jacket pocket. One in each pant pocket. 2) Toe warmers- one in each shoe. 3) Body warmers (adhesive pad)- one on the chest, one on the lower back, and one on the inside of each pant leg. This is probably excessive for many but it was perfect to keep me comfortable. I liked two in each jacket pocket because when we weren’t shooting, my gloved hands would go in the pocket and hold the two packets. One did not seem enough to keep my hands warm.
- Reloading Breaks: during these periods, I would be inside the classroom house and stood by the heat radiator. I did not have to reload since I came with 22 preloaded AR mags and 24 pistol mags. I used this free time to listen and learn, warm up, snack, hydrate, restroom breaks, etc.
- Balaclava. 10% of heat loss occurs through your head and neck and covering this area is critical to staying warm. I used a $34 balaclava from Outdoor Research, which has a thermodynamic fabric that kept my head, neck and lower face warm. Pulling the balaclava fully up to my nose caused my Eye Pro to fog up so I kept it on my chin. There are other options like the Cold Weather Liner from Unity Tactical but it costs $119, requires you to remove and adjust your helmet pads, and does not cover your neck.
- Nutrition Hydration: It was too cold to sweat but there is still significant water loss in breathing, especially as the temperature dropped. I brought a thermos of hot water and one with electrolytes that kept me warm and hydrated. This class had no official lunch breaks so you had to eat on the go, mostly during the reload periods. Frequent bladder breaks also helped to keep you comfortable.
- Layered Clothing: Top- Compression shirt, Compression arm sleeve (Academy), Merino smart wool long sleeve, Goretex windstopper shell, Helion jacket (defense mechanisms), Outdoor Research balaclava. Bottom- Gore-Tex insulated compression tights, 5.11 TDU pants, Smart wool socks, and Salomon Gore-tex boots with toe warmers. Hands- PIG FDT gloves from SKD Tactical
- Plate Carrier: no one wore an APC although it probably would have added great wind and cold protection.
- I cannot stress enough to do whatever it takes to be comfortable and nourished. You cannot learn effectively when you are shivering and can even be unsafe if you cannot think straight.
- Cat-Crap: prior to class I applied this anti-fog treatment to everything glass on my rifle, pistol, and NODs and nothing fogged up. My eye pro would fog if I pulled the balaclava higher but that was it.
- Sacrificial lens: Several students had their sacrificial lens fog at some point during the class despite using cat–crap. I had my lens secured with Camo wrap for security, but it also served to seal the moisture out and did not experience fogging issues.
- Lubrication: avoid heavy lubes as the cold weather makes them more gunky. I used Slip 2000 gunlube and applied more liberally than usual to all the shiny parts.
- Gear freezing. My rifle trigger is a Geissele SSA-E and it normally has a light two stage pull. On the second day, it got so cold and frosty that my trigger became harder to pull. I thought it was a malfunction but after ruling out any problems, I just pulled harder and the rifle fired. Keep this in mind and squeeze the trigger harder, esp if you are wearing gloves.
- Malfunctions: there were many more stove pipes, double feeds, failure to eject malfunctions than usual, which provided clearing opportunities under NODs and gloves. Wearing gloves was a must with the cold but it was foreign to most of us. I usually never wear gloves unless it is to staple targets, move steel, or barrels and manipulating the controls with cold fingers and gloves added challenges.
- Mag pouches: My Esstac Kywi rifle pouches became very stiff in the cold weather. Removing them for reloads was not a problem but reinserting the mags required more force. Aluminum USGI type magazines were more difficult than polymer ones.
- Helmet Pads: I have the 4D tatical zero G deluxe helmet pad liners (best ever investment for fit and comfort) and they can become very stiff with the cold. Pro-Tip: put a hot hand warmer in the helmet ahead of time so that the liner will be warm and soft when wearing.
- NVG position: For NVGs that can articulate vertical and horizontal- avoid flipping the NODs vertical as it will accumulate moisture condensation. When not in use, keep them horizontal but rotate them up above the helmet visor.
- WHEN DONE WITH TRAINING:
- Do NOT put the helmet in a storage bag. Leave the helmet, optics, rifle (open up the chamber), pistol out at room temperature so that moisture can evaporate and nothing collects in the nooks and crannies.
- Use oil to cover the muzzle device and BCG parts and leave them overnight. The oil will help break up the carbon, which will be extensive if you shot suppressed. I found this made it much easier for me to clean the following day.
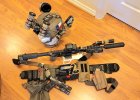
- NVD: Team Wendy Carbon bump helmet. NVG- DTNVS with Elbit tubes (thin filmed, white phos) mounted on Wilcox L4 G24. Surefire vampire pistol light (right side) on a Thyrm VariArc mount. TNVC Mohawk Mk1 Gen2, and Ops-Core AMP ear pro. Interesting fact: I have yellow tint eyepro and it turned my white phos into a light green hue, which was functionally fine.
- AR Pistol: LMT AR Pistol 11.5 inch with OSS Hx QD Ti 5.56 suppressor. MAWL C1+ laser/illuminator on right side of rail and Modlite PhlV2 on left side. My WML is extended further to the flash hider and is mounted on a T-Rex Arms light bar scout mount (T.REX Lightbar Scout Mount – T.REX ARMS (trex-arms.com)). After trying the light on right and left side, I prefer the left: 1) it balances the weapon better 2) it allows me to transition easily from the MAWL laser button (on rail) to the WML tail click button (11 o’clock), and 3) it is a spacer on the left side between my hot suppressor and my legs during pistol transitions (the MAWL is my spacer on the right side).
- Pistol: Shadow systems MR918 with Zev V2 compensator, RMR 09 red dot and SureFire X300B WML.
- Belt: T-Rex Orion, Esstac Kywi rifle pouches and HSGI polymer taco pouches. Holster T-Rex Arms Ragnarok
- Changes: After the two nights of NVG training, I was happy with my helmet and weapon set up and would not change anything. Several of the students did change their gear after the 1st evening. The most common change was weapon mounted light placement when using the MAWL laser. Many students had their WML on the right side underneath the MAWL, which interfered with zeroing.
DAY 1: 1645 to 0100
What I appreciated about this class was that there was minimal lecture time and no power points. I had attended an 8-hour NVG intro class at the Shooter Symposium and the instructor gave us a three-hour power point talk on the history, science, technology of NVD. Yes, it is important to know the concepts, but three hours in an 8-hour class is excessive.
JD spent the classroom time going over the equipment we had, troubleshooting some setups, and showing us practical tips such as:
- How to optimally use the ratcheting wheel for retention. Previously, I just put on the helmet and started cranking that wheel. Pro-Tip: push the front of the helmet into your forehead with one hand and then turn the wheel until snug. This actually worked better.
- Vertical Retention straps- use to adjust your helmet if it is not horizontally balanced.
- Horizontal Retention straps- use to adjust the forward and backward tilt of your helmet.
- Counterweights- if need more, then use the fishing or scuba gear lead weights to add balance with your front NODs
- Don’t use the eye cups that come with your NODs- they obstruct your ability to look under your NODs and passively aim
- Set the NODS 1-1.5 inches away from your eyepro or eyes. This enables you to look down or tilt your head up to look forward
- Adjust your NODs so that there is slight overlap of the left and right circle like a Venn diagram. This gives you slightly more peripheral vision than the 40 degrees
- Three types of zeroes: converging (intersecting), parallel, and infinite zero (had not heard of this one).
We went out to 200 yards and each one of us shot steel standing unsupported. I had a lot of wobble and had to learn how to fire with an acceptable sight picture rather than a stable one.
We concentrated next on learning our offsets for our optics, our laser, and with the rifle canted (CQB mode). This was done at different yardages. A drill called GROUP THERAPY was particularly valuable in revealing your offset. Another drill had us draw a small square at the bottom of the cardboard/paper target. A small semicircle was drawn around the box and we were to shoot at the square. The goal was to keep the laser within the semicircle while trying to aim for the square, and to try different mechanics (changing length of pull, pulling in harder with support hand, raising firing shoulder up and forward, etc) to see which combination was most stable. Placing the square at the bottom meant that all rounds went into the berm and we could concentrate on just the laser position inside the semicircle rather than trying to see the holes in paper. The laser is more visible and you are able to better assess how different mechanics affect rifle stability.
Day one focused us on knowing our weapon systems (both rifle and pistol): switch-ology of our different lasers/lights, when to use white light, passive aiming, vs IR illumination and laser. Shooting with gloves added an additional challenge to manage our buttons and controls. Methods to control our wobble and be comfortable with an acceptable sight picture while shooting and moving was the focus for the remainder of day one. Practical tips were also given to optimize reloading with NODs. We ended at 0100 with 240 rounds expended.
DAY 2: 1700 to 0100
The Ranch is a private outdoor range that has a lodge on premises. I was fortunate to sleep overnight at the lodge and woke refreshed. I spent the afternoon before class confirming optic zero and practicing the techniques JD taught us. Day two was a few degrees warmer but had more humidity. We began the application portion of our fundamentals from day one. We did numerous drills of moving and shooting, both front/rear and lateral and oblique- using both paper and steel. We practiced transitions between close and distant targets. There are basically three different transitions based on distance. For close transitions (less than a yard apart), moving your arms from A to B is most efficient. For medium transitions (5 yardish), rotating your knees while keeping your torso front facing was best. For longer transitions, rotating your knees AND pivoting on your feet worked well. JD also encouraged us to think of transition skills as not just shooting two targets: A & B, but it could be one target moving from one point A to point B. We would start with one round per target, then escalate to two rounds, then three rounds, four rounds, etc. All drills started with rifle then repeated with pistol.
One issue I had was visual patience; waiting for the dot to settle into an acceptable wobble zone before firing. You cannot miss fast enough is so true.
Towards the end, JD did timed exercises as individual competitions. It was performance shooting under NODs and involved movement (front, back, pivoting, rotating), close target acquisition, knowing your offsets (for the close targets), navigating under NODs, target transitions, and throttle control. The competition was a conglomeration of all the basic skills we learned. I was definitely not the fastest nor the slowest. JD went last and whoever had times better than him earned the Mocha Bear patch. No one got it.
“When you buy “Grip”, you also get trigger and recoil control as part of the purchase.” This resonated with me as too often, we work on each piece individually. A successful grip locks the weapon whether it be in your shoulder (rifle) or hands (pistol) and facilitates both recoil and trigger control. Trigger control is necessary but not sufficient by itself for fast accurate shooting. And of course, you cannot successfully manage recoil unless you have a good grip.
Day two also ended around 0100 with about 400 rifle rounds expended. There was a brief classroom time after class when we all debriefed and received swag.
This class is an excellent start for anyone getting into NV. The key features that made this course outstanding were:
- JD’s fun-loving personality. He knows his stuff but delivers it in a light-hearted manner that makes you comfortable and receptive. Knowing something and teaching it well are quite different assets. His mission in life is to learn and have fun, which is exactly what we did. He’s the kind of person you would invite to your family’s BBQ and hang out with.
- The knowledge he imparted to us was serious, deadly serious-perhaps even more than a daytime class given the restricted peripheral vision of NODs. However, I felt safe the entire time and, in his words, “be as violent as possible while being as safe as possible.”
- Knowing the audience: JD’s points of instruction were organized and fluid. He could adapt and change the POI based on how the class performed. This reflects a good teacher who is able to improvise and be flexible to the students’ needs. The class size was ideal (10 students). If 17 actually showed, I think an AI would have been essential.
- Skill Stacking: all of the techniques we learned built on the previous skills and the drills reflected that in progressive complexity or challenges.
Final note; as fantastic as the class was, nothing compared to the beautiful night sky under NODs. We saw billions of stars blanketing the sky, shooting stars, satellites, and even the faint outlines of the Andromeda galaxy. Every chance I got I would look up, wondrous and awed at how lucky we are to be alive, in this country, with the opportunity to own NVDs, shoot guns, and enjoy the freedom that we all shared that night. Take care gents.
P.S. Thank you to G.W. who also took this class and reviewed my post for factual accuracy.